❌

Normal view

There are new articles available, click to refresh the page.
Before yesterdaySAP EWM Blog by Manish Gupta

SAP EWM CF136: Setting Up Bulk Storage for EWM Managed Warehouse in SAP

Β This is going to be an advanced level of configuration as we are also going to configure the Auto Packaging and Queue determination for our Bulk Storage Putaway process and we are going to use the RF Menu to perform the Putaway process.

Step 1: First of all we need to create a Storage Type as Bulk Storage and mark the storage behavior as 2.

We have made the HU requirement mandatory. In the Putaway Control, the HU type check is activated and Putaway Complete icon is activated. Putaway rule is selected as 2 which means, the stock will added to the existing bins with HU inside first.

Step 2: Create activity area for our Bulk Storage

Step 3: Create Storage Bin Type for our Bulk Storage

We are creating SBT BK05 which is only to be used in Bulk Storage Area and since our forklift can reach up to 5 meter, the SBT will be of 5 meter

Step 4: Define a Bin Access Type for Bulk Storage Area so that we can assign to our resource when Putaway will be done β€” This is not a mandatory step.

We created FORK Access type and it will assigned to the Storage Bins as well so that Bulk Storage bins can only be accessed by forklift.

Step 5: Since our Bulk Storage is a small area in our warehouse we will have 5 bins based on below Layout and Pallets will Stacked in these 5 Bins.

We can create 5 bins manually and each bin will be able to keep 5X5 i.e 25 pallets at a time.

Step 6: Assign Bins to the Activity area and assign sort sequence

Tcode : /SCWM/SBST

Step 7: Now we need to have a HU Type assigned to our Bulk Storage Type, make sure HU management is active in the warehouse and since we will only keep Full pallets in our bulk storage bins, we are assigning Z003 to our storage type.

Step 8: Now we need to define Bulk storage Strategy to our warehouse and complete the configuration

We need to maintain storage type controls for bulk storage.

We created a bulk Storage indicator, it should be assigned to the product master.

Now we need to define a bulk storage indicator and since only pallets can be stored in our bulk storage area, we have assigned Z003 HU Type as well.

Step 9: Now we need to create a resource type for our Forklift which will be used to to putaway and Pick stock from the Bulk Storage Area and only forklift can be used to manage stock in this area.

Assign Bin Access type to the resource Type.

We have assigned HU Group ZMAN which was already assigned to our HU Type Z003 which belongs to the Pallet HU type.

Step 10: Now we need to create a PACI for our Bulk Storage and since we are only going to putaway full pallets in the bulk Storage, if there is any stock left without pallet, it will go other storage type.

Step 11: Assign SBT to the Storage type for Storage bin determination during Putaway.

Now assign HU type to the SBT

Step 12: We need to maintain Product master data.

Step 13: We need to create packaging specifications for our product if we want to automate the packaging process when an inbound is created, this can be done manually also so this step is not mandatory.

Step 14: Now we need to maintain the resource type and queue data so that we can assign the WTs to the resource Forklift and carry out the putaway process using the Forklift in the Bulk Area.

Create Resource Type

Assign Bin Access Type

Define Queue type

Define queue

Define queue determination

Define Queue access sequence

Use tcode /SCWM/RGRP to maintain resource Group

/SCWM/QSEQ to maintain queue sequence for resource Group

/SCWM/RSRC to maintain resource

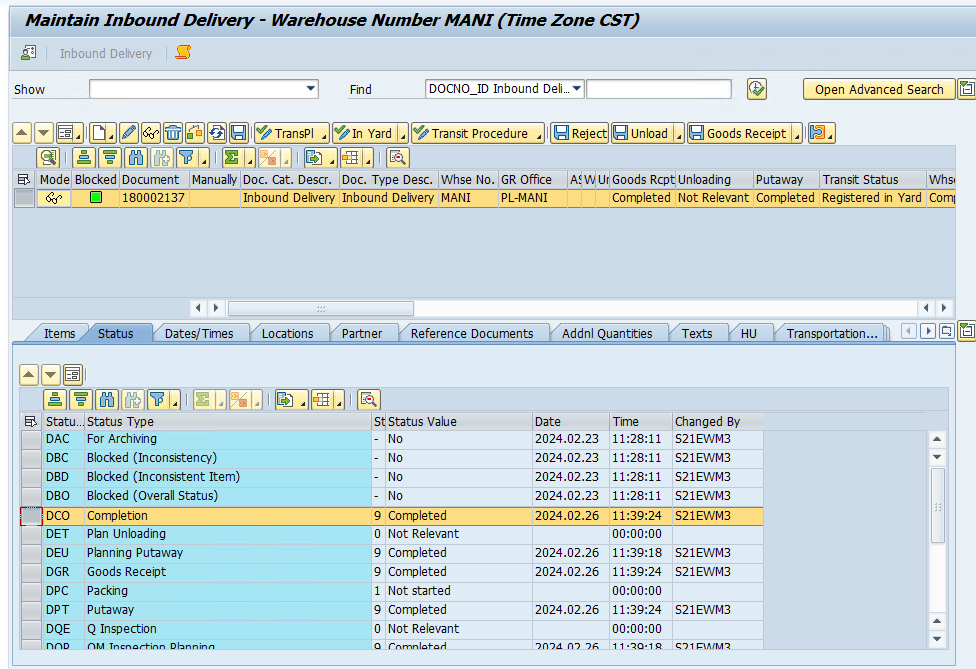
Step 15: Now we will create an Inbound delivery and check in the EWM if it is distributed and if HU was created automatically, if HU is missing please create an HU manually. Click on Goods Receipt.

Now use the subsequent function to create WT.

Since we created Inbound for 120 qty and HU only allows 100, we have an HU and 20 quantity as unpacked. First, we will create HU WT. Click on the Create and Save button.

The Product WT is going to be kept in 0050 strType

The WO for HU has been assigned to the queue INBOUND because of the bin access type and the other WO is a stand-alone WO for 20 qty.

The superviser can now assign these WOs to the resource manually or recource can pick up the WO based on queue from the RF Menu.

System Guided > System Guided selection

Now scan the Bin and HU and click enter

Now scan the destination bin and HU and click enter. The process will be completed. Now check the Inbound delivery and see what is the status.

Putaway is partially completed, we also need to Putaway the 20 qty in storage type 0050.

We can do that using Warehouse monitor or tcode /SCWM/TO_CONF or using RF Menu. Click on the confirm plus save button.

Check the Inbound delivery now.

SAP EWM Error 1711: Error during Putaway process using RF Menu

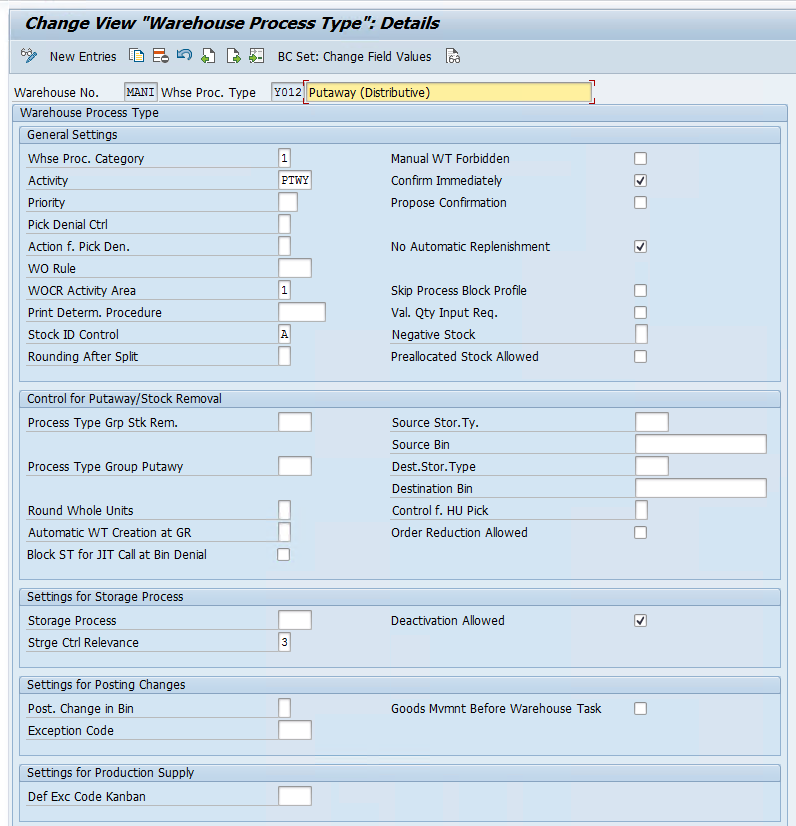
Β The warehouse process type for distributive putaway is not defined correctly /SCWM/RF_DE051

This is a very common error during the execution of the Putaway process while using the RF Menu, this is a configuration error and the below WPT needs to be created and configured.

Step 1: Create WPT Y012

Step 2: Maintain the below field.

SAP EWM CF 135: Setting Up Cycle Counting Process for Physical Inventory in an EWM Managed SAP Warehouse

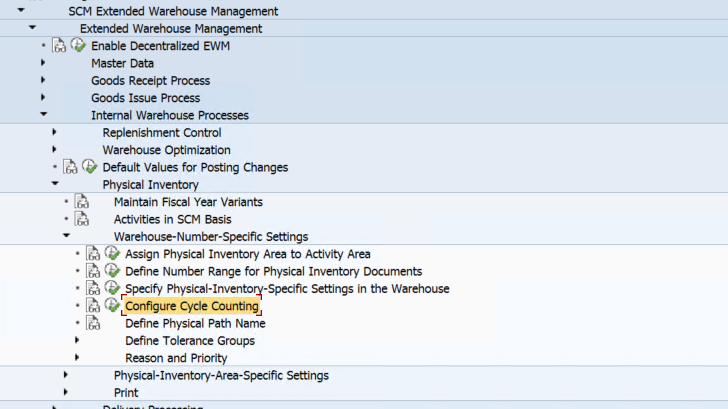
Β Step 1: Use the below IMG path and set up cycle count indicators for your warehouse.

We have maintained the below parameters

Here 3 indicators are maintained with intervals in days after which cycle counting needs to be carried out for Products with these indicators.

Step 2: We need to maintain this indicator in the product master so that cycle count can be carried out.

The CC indicators can also be assigned with the help of /SCWM/ABC TCode.

Step 3: Make sure the cycle counting PI process is assigned to your Physical inventory area.

Step 4: User Transaction /SCWM/PI_CC_CREATE to create CC PI doc.

Remove the simulation mode.

Step 5: Now we can activate, count, and post the PI doc with transaction /SCWM/PI_PROCESS

Step 6: Now we can clear the difference using /SCWM/DIFF_ANALYZER

Once we click on the post and save, WT will be created and GR/GI for the product will be executed based on the difference in the count document.

SAP EWM Error 1710: Error during Return To Vendor Process

Β 

System could not determine source storage bin

Message no. /SCWM/L3008

If we have completed the Putaway process for an IBD in the EWM system, we can create an outbound delivery against the PO but during the Picking Process system will not allow us to pick up the stock from the physical location and it will give an error.

To overcome this issue, we need to first move the stock to the 9010 storage type and carry out the stock removal process for the RL delivery. Also, make sure to change the stock type to F1 if picking is not allowed for F2 stock.

Now carry out the picking for your RL OBD Create and confirm the WT for Stock Removal from 9010 Storage type to 9020 Storage type.

Complete the PGI and RTV process will get completed. 122 movement type will get posted in the S4 system against PO.

EWM CF134: Integrating EWM Staging Process for Production Planning | SAP EWM-PP Advanced Integration

Β Step 1: Create Material Master β€” 2 raw materials and 1 Finished Good

Step 2: Create BOM β€” CS01

Step 3: Create PSA in S4 β€” PK05

Step 4: Create Work center β€” CR01

Step 5: Create Routing for FG β€” CA01

Once BOM and Routing are created, maintain the production version for the finished good in the material master data.

Step 6: Create Control Cycles for Components in S4 β€” LPk1

The staging indicator needs to be 5 which stands for EWM Staging and the Staging type will be selected in the EWM system.

This is all we need to do from the S4/ERP side and now we will cover the configuration and master data needed in the EWM system to carry out the Staging for Production.

Step 7: Activate below BC Sets below by using SCPR20 Tcode first

/SCWM/PMR*

Step 8: Now we need to set up the PSA Area in EWM.

First, we will create a Storage Type (1000) which will used as a PSA Area. Here StrType Role K stands for Production Supply.

Now we need to create a Bin which will act as a physical area for Production Supply and all the components will be stagged in this bin.

Tcode: /SCWM/LS01

Step 9: Now we need to define the Document type for PMR which will get created in the EWM system once we trigger WM stagging from our production order.

If we have activated the BC sets correctly, Doc type PMR and Doc Category PWR will be already available along with item types and allowed item types for production.

Step 10: Now we will map the ERP doc type with the EWM doc type to create PMR in the EWM system.

Step 11: Now we need to create a WPT to Stage the components and a WPT to Clear the PSA Bin in case stock is still left once the Production cycle is over.

Step 12: Now we will set up WPT determination and Stock removal strategy for our product.

we already created picking strategy, we will just add the indicator in product master for our components.

Step 13: Create PSA in EWM β€” /n/scwm/psa_replicate

We can also create and assign the PSA bins in EWM with TCode /n/scwm/psamap

Step 14: Define product group and product group type

Step 15: Maintain Product group in material master in Basic data 2 View, we are only going to use the CrossOrder Staging method in this blog.

Step 16: Assign Bin to PSA/Product/Party entitled in EWM β€” /SCWM/PSASTAGE

We have maintained this for our product group, this can also be done for the each component individually.

Step 17: MaintainProduct Group Type and Warehouse Parameters for Production

Now we will create a production Order in the S4 system and try to generate a PMR doc in the EWM system.

CO01

Release the ProdOrder : CO02

Carry out WM staging from change mode by clicking on execute button.

Save the ProdOrder and check Warehouse monitor for PMR

Now we can start with the staging process by using tcode /SCWM/STAGE

We can also use the below Fiori app and click on create Warehouse Task

Now once this is done we will have the WTs created which we can check in the warehouse monitor, we will confirm the WTs to move the stock to the PSA Area.

Once this is done, we need to consume the components. We can use below Fiori app or RF Menu

this will create a WT for GI. You can see this in the below Screenshot. First, the material was stagged and then material was consumed.

We can see in the PMR, GI is completed, and subsequently material docs with 261 mvmt type are posted in the S4 system.

If we TECO the ProdOrder.

Prod Order status will change in PMR

After posting GR for the Finished goods and final settlement. The Production order will be completed.

EWM CF133: Configuring Auto Packaging (Pick-HU) with WOCR during Outbound Process for EWM Managed Warehouse inΒ SAP

In this blog, we are only going to cover configuration related to Auto Packaging and not the WOCR and Packaging Specification.

To set up the initial WOCR configuration, Please check out this BLOG.

To set up the Initial Packaging Specification configuration, Please check out this BLOG.

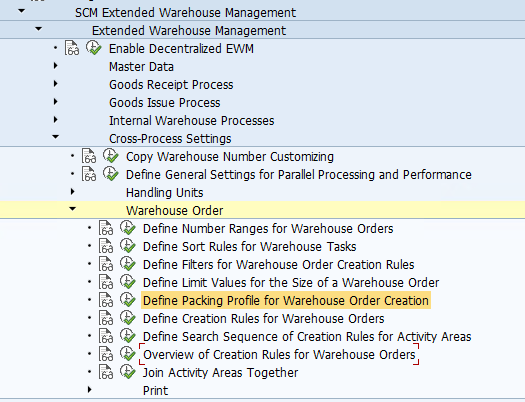
Step 1: Define the Packing Profile for WOCR

We have created a Packing Profile MCAR which stands for packing of Products in Cartons. This Packing Profile will be used in the Packaging Specification for the Product.

\

Step 2: Maintain the Packing Profile in the Creation Rule for Warehouse Orders.

Since I have created WOCR 0050 for this Blog I will give an overview of the WOCR.

Step 3: Maintain a Storage Bin for the HU Packing.

We need to create a Storage Bin in a Storage type where the Packing of HU will take place, make sure you create this Bin under a Storage type that allows HUs, we are using standard Storage Type 8030β€Šβ€”β€ŠPack in Goods Issue. Tcode: /SCWM/LS01

Now assign this to the activity area for this we created our WOCR and activated auto packaging through WOCR. /SCWM/SEBA

Step 4: Now we need to maintain standard WPTs at the Warehouse level to successfully create Pick-HUs

Step 5: We need to maintain the master data for our Product/Material Master Data to pack the product during warehouse order creation. We also need to maintain the Packspec.

Maintain Packaging Material Type in the Material Master.

/SCWM/PAKSPEC Create a packaging specification

Now we can test our configuration, first, we need to create an OBD in the S4 system and make sure it gets distributed to the EWM system.

Create a Picking WT and use Tcode /SCWM/TO_CONF to confirm the open WO.

As can be seen in the below Screenshot, Pick-HU is created automatically.

Once we confirm this WO, the HU will get created and moved to the GI ZONE for PGI.

Now we can complete the PGI.

SAP EWM CF132: Physical Inventory Process Configuration and BusinessΒ Process | SAP EWM Configuration

Β We will go through the EWM PI configuration and Business Process.

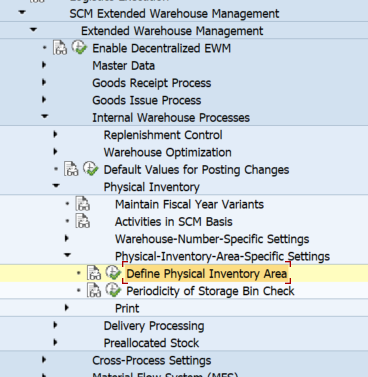
Step 1: first we need to define the PI area

You specify the following per physical inventory area:

  • Whether a putaway physical inventory is allowed (once per PI period)
  • Whether a low-stock/zero-stock physical inventory is allowed (once per PI period)
  • Whether a low-stock/zero-stock check is to be carried out when the warehouse task is confirmed
  • Whether the document is to be posted automatically after the count (this depends on the user’s allowed tolerance values)
  • Whether the book inventory is to be proposed at the time of the count and at the time of printout (does not apply to radio frequency environments)
  • Whether the inventory quantity is to be proposed at the time of the count but not at the time of printout (does not apply to radio frequency environments)
  • Whether the product data is proposed in the case of the storage-bin- specific physical inventory
  • Whether it is allowed to count a handling unit as complete
  • Whether you want to count collectively the number of handling units or the number of items inside a handling unit. (The prerequisite of activating handling unit collective counting is to select both HU Complete checkbox and Display Item Objects at Time of Count Entry checkbox)
  • Whether the product data is included in printouts
  • The threshold value for the low-stock physical inventory or check (in the case of the zero-stock physical inventory or check, leave the field initial or zero)
  • Whether to ignore the setting of the default stock type that is set on the warehouse level for a physical inventory area.
  • Whether to enable a tolerance check for low-stock check at stock removal before the system posting an inventory difference to difference analyzer. (If an inventory difference doesn’t pass a tolerance check, the system cancels the low-stock check.)

Step 2: We need to define Activity Area for PI

Assign bins to the PI Activity Area

Execute /o/scwm/sbst and assign the act area to the bin

Assign Activity PI to AA 0001

Step 3: WH Specific settings

Assign PI area to Activity Area

Assign number range

you can make the following physical-inventory-specific settings for each warehouse:

  • Currency unit
  • Factory calendar
  • Period (fiscal year)
  • Determination procedure for printing physical inventory (PI) documents to use
  • Month and day of (yearly) PI period, if different to fiscal year
  • Whether the owner is proposed in the physical inventory count
  • Whether the person authorized to draw is proposed in the physical inventory count
  • Whether adjustment postings are allowed in the Difference Analyzer
  • Permitted percentage deviation when inputting a quantity for the physical inventory count
  • Whether the percentage deviation for the physical inventory count is to be checked

The percentage tolerance check is only used when inputting information on the user interface, it is not used when saving or posting. Separate tolerance checks are available for saving and posting.

  • Assignment of a number range interval to physical inventory documents
  • Whether physical inventory completeness should always be determined at the warehouse level only
  • Whether the system checks if the counter entered a valid party entitled to dispose for a product when posting the results of a PI count in SAP Extended Warehouse Management (SAP EWM)
  • Whether the system checks that the counter who recounts the PI documents is different from the original counter

Define Tolerance Groups

Define Reason and Priority

Assign a Tolerance group to Users

Steps to carry out PI at the EWM level

Annual inventory

/SCWM/PI_CREATEβ€Šβ€”β€ŠCreate Physical Inventory Document

/SCWM/PI_COUNTβ€Šβ€”β€ŠEnter Count Results

/SCWM/DIFF_ANALYZERβ€Šβ€”β€ŠDifference Analyzer

/SCWM/PI_USER_DIFFβ€Šβ€”β€ŠAssign User to Tolerance Group for Difference Analyzer

/SCWM/PI_USERβ€Šβ€”β€ŠAssign User to Tolerance Group for Recount/Clearing

Step 1: Create PI document

Step 2: Process PI doc and count

Stock is now counted- diff posting is pending, click on the post

Step 3: Analyze the Difference.

Once this WT is confirmed- The difference will be posted at EWM as well as the S4 level

SAP EWM CF131: Setting up Fixed Bin Picking Strategy with FIFO for an EWM Managed Warehouse in SAP

Β In this Blog, we are going to learn about how to set up a Fixed Bin Picking strategy by using a Stock removal control indicator and the Oldest quant based on GR date will be Picked First from the Fixed Bins.

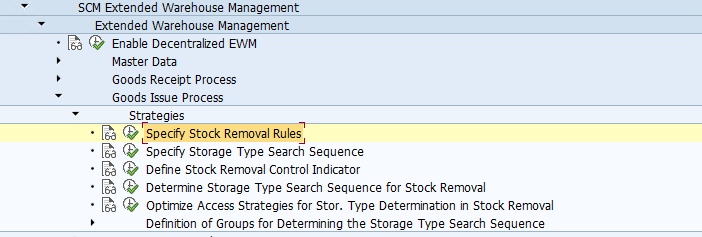
The Steps involved in this configuration are available under the same node as can be seen below.

Step 1: Specify a Stock Removal Rule β€” FIFO

Assign the sort field WDATU to the FIFO Rule

WDATU stands for Date and Time of GR

Step 2: Define Storage Type Search Sequence and assign Fixed Bin Storage Type

Step 3: Define Stock removal control indicator

Step 4: Maintain Storage type Search Sequence

Irrespective of WPT if the RMVL Indicator is FIXB, the system will consider FIXB search sequence and FIFO strategy during stock removal.

Step 5: Maintain Access Strategy for the Stock removal.

Now we need to maintain this removal indictor FIXB in the product master.

Once this is done. We will create a sales order or an sto and generate an OBD to check if our strategy is working fine.

Just click on the create+save button and the system will create a WT with a source bin from the 0050 Storage type which is our fixed bin storage type.

SAP EWM BP558: How To Auto Pack and Print HU in SAP EWM Managed Warehouse

Β We are going to cover the EWM business process related to the Auto creation of HUs through Packaging Specification and Auto Printing of HUs through PPF Action for an Inbound delivery.

First of all, we need to configure the Packaging Specification for our Warehouse and we can refer to this BLOG for the same.

Once configuration steps are completed, maintain a multi-level PackSpec using Tcode /SCWM/PACKSPEC. We can also use the same setup for single-level PackSpec as well.

We need to maintain the condition record for our Product. Add the Product in the PackSpec and Add 2 levels. We need to maintain 2 Levels in the Level Set while configuring packaging specifications.

We have maintained 2 level types for our level set and each level type has a different element type.

Element Type CART was created for Carton and Element PALL was created for Pallet with Main packaging material as HU relevance.

Once this is done we need to activate the Auto Printing for our Packaging Material Type through PPF Action.

Step 1: Define the Action profile and Actions for the application.

IMG > SCM EWM > Extended warehouse management > Cross process settings > Handling Units > Basics>Print> Define PPF Action Profiles

Application: /SCWM/WME

Action profile: /SCWM/HU

Action Definition: HU_LABEL

Processing type method: /SCWM/HULABEL

Step 2: Now we need to define PPF Action Conditions

IMG > SCM EWM > Extended warehouse management > Cross process settings > Handling Units > Basics>Print> Define PPF Action Conditions.

Step 3: Define Print determination procedure.

IMG > SCM EWM > Extended warehouse management > Cross process settings > Handling Units > Basics> Print > Define Determination Procedure

Step 4: Assign the Print determination procedure to the packing mat type.

IMG > SCM EWM > Extended warehouse management > Cross process settings > Handling Units > Basics> Assign Determination Procedure

Step 5: Maintain Condition Record by using Tcode /SCWM/PRHU6 or /SCWM/DLVPPFC

Also, It is important that we de-activate the option No Automatic Packing from the Delivery type for which we need to Auto Pack HUs.

Now we will create an IBD in the S4 system and on successful distribution, HUs will get created automatically.

HUs will be auto-created in the EWM system and Print will get triggered in the background which we can check in SP01 Tcode.

Please feel free to reach out onΒ LinkedInΒ if you have any queries or need help with your project.

❌
❌