A few months ago, I started working on a client business requirement to do Allocations in Margin Analysis (formerly known as COPA or Profitability Analysis) to allocate certain overhead costs using the COPA Top-Down Distribution functionality. I worked with it several times in the past with the old KE28 and lately with the new "Universal Allocation" functionality using the new Fiori App "Manage Allocations".
The business requirement that I had was a bit unique that I did not know if it was even possible to achieve it. Finally I was able to make it work, so I decided to make a post out of it since, as usual, I like to post things that I did not find on the Internet so the community can benefit from it.
We will start from the beginning with a bit of details about it ...
As a previous step for this Top-Down Distribution Allocation (TDD), we did a Margin Analysis - Overhead Allocation from Cost Centers into a high level Profitability Segment like Company Code and Profit Center using an Assessment Allocation Cost Elements (In our case, an account starting with 942xxx). Once we had executed this Overhead Allocation, that will leave us the postings in a high level Profitability Segment that will then be picked up by the TDD.
The TDD will spread (re-post) the values on a proportional basis based on Ex. Sales Qty (KG in our case). This reposting is done within the same Allocation Cost Element / GL Account (Ex. 94200200 – Distribution Costs). At the end resulting in a reclass within the same account. So, each Sale transaction record will be used to have its proportional / fair share of those Overhead costs being allocated.
We had 2 different type of business requirement that we can summarize like this.
2 different types of TDD,
•Simple (Cost from Cost Center are Allocated / Spread based on the Sales of the same Company / Legal Entity)
•Complex (Cost from Cost Center reside on Legal Entity A but are Allocated / Spread based on the Sales of the Legal Entity B)
Note: the term Simple and Complex are not SAP terms.
The Complex TDD was the one that was quite unique and the 1st time I faced such a requirement, so I was not even sure it was possible nor I was able to find anything online that would indicate that. Thus, the reason for my Blog today.
Simple TDD
This is how we will build a TDD Allocation cycle for a "simple TDD".
Will create the Cycle with code, description and a Valid to date.
A TDD Cycle can only have 1 Segment, different to the other types of Allocations that allow for multiple segments.
Based on “posted amounts” (actuals) and variable proportions.
Senders we leave it as-is, no changes required.
Here we need just a few dimensions, not all the ones available for Sender Basis. So, we will need to remove a few of them and leave the ones above.
Account number: We will use the specific group called TTD_CE created for this that contains all our Allocation Cost Elements type 42, since we used more than one Assessment account starting with 942xxx. By doing a group, we can re-use it for other cycles easily and we don't need to enter all accounts manually.
Our Company Code is 1000.
Remember ... prior to this, we had our postings already done at a high Level Company Code and Profit Center.
Receiver we
leave it as-is.
This is where we will match the “Sender” data with the “Reference data” (our Sales).
Variable Portion Type: QUANT1 – Quantity 1, so based on our Sales Qty.
Profit Center: ALL VALUES , to take into account all Profit Centers
Same for Functional Area and Segment.
Account Number: will put our Sales Account. In our example 41000009
Now at the far right, each Selection Criteria characteristic has an icon that we need to click to expand our input for the "Reference Base" (Our Sales data matching).
Profit
Center Mapping, we need to do a 1:1 for all Profit Centers involved on the
Sender and Reference side.
For Accounts, we will map every account that is part of the TDD_CE against our Revenue account (like above)
If we have more than 1 Revenue Account, then we can create an Account group that will include the several revenue Accounts. This will be used in the “Selection Criteria” and in the “Reference Base Mapping”.
Company
Code 1:1
Functional Area, Segment, etc. ALL to ALL.
Complex TDD
In the “complex TDD” scenario, we want to Allocate (spread) the Expenses / Costs of one CoCode, but based on the Sales of another CoCode. Ex. Allocate Compay Code A Expenses, but based on Company Code B Sales.
The creation of the Cycle is the same as before for simple TDD scenario, with minor tweaks.
Sender Basis in this case is for the Expenses of Company code 2000.
Receivers stay the same.
Receiver Basis stay the same as in the Simple TDD scenario, being the Company Code 1000 (the one with the Sales).
With this Reference Base Mapping setup 2000 Sender and 1000 Reference Data, we are telling the Allocation to use the Costs of Company Code 2000 and reference it with the Sales of 1000. Just this little tweak in the Reference Base Mapping is key for this cross Company Code Reference Data to work.
Note: the Allocation postings will still remain in the same Legal Entity / Company Code, in our case 2000 and will not be generating any Cross Company Code postings. It is just for the reference calculation the Cross Company Code specification.
All the other Reference Base mapping still apply the same as in the Simple TDD scenario. The only one that is different is the Company Code one (like above).
Note: Margin Analysis Top-Down Distribution Cycles CANNOT be downloaded and/or uploaded using an XLS Template like the other Allocation Cycles. Instead, they will have to be created manually in each environment (Ex. QA and PROD). But, once 1 Cycle is created, a COPY function is available and then you can modify the parameters for that cycle accelerating the creation.
If your Company and/or Project needs to implement this, or any of the functionalities described in my Blog, or need advise about them, do not hesitate to reach out to me and I will be happy to provide you my services.
For those of you that work or have worked with Actual Costing, I am sure that you have used, and continue using every day, Transaction CKM3n - Material Price Analysis. This is the go-to report / transaction to analyze the costs and actual costs of a given material during an accounting period. This is "the bible" for Actual Costing information on Materials.
The transaction is really nice, it gives you a lot of information on Receipts, Production, Consumptions, Deliveries, Revaluations on a Standard basis as well as including Actual Costs. There is "almost" nothing better out there in standard SAP Actual Costing than this transaction. But ... it has a very big limitation, you can only display 1 Material at a time in 1 Plant and for 1 Accounting period at a time. There is no other good transaction for many Materials. If you are dealing with multiple plants and multiple materials, then it is going to be hard to do multiple analysis. (some would mention KKML0 as an alternative, will there shortly ...)
Another good piece of information that this report provides you, is the breakdown of the figures by Cost Component (considering you have activated Actual Cost Component Split in your system).
As you can see above, you get a lot of valuable information like Beginning Inventory, Revaluation, Receipts, Consumption and finally Ending Inventory; which is also something really nice that many Cost Accountants would need (All the In's & Out's during the period).
Note: To be able to obtain all these calculations in CKM3n, you need to be using Actual Costing and running it on a monthly basis. Otherwise, this transaction will show you only "Price History" information which is line by line each transaction, the standard cost, quantity, etc. Only with actual costing you will have calculated beginning and ending inventory and their corresponding "price difference" (Actual costing).
Now if you want to do a Mass report for the information in CKM3n, you will have to build a custom report for it; which I will explain you what will be your source tables for this information.
In the picture below you will have a more detailed and exploded view of the different categories in CKM3n
You can easily reproduce these with the 3 Tables below, which I will explain each of them:
FCML_MAT_V
FCML_REP_V
FCML_CCS_REP_V
Will start with the 1st Table FCML_MAT_V
This table has the "Master Data" type of information (Ex. Plant, Material #, Description, Valuation Class, Profit Center, Company Code and the most important one "Cost Estimate number", among some.
If you are also dealing with Customer Stock or Project Stock, you also have the Stock Type, Sales Document and line item number as well. Same as you would need to enter in CKM3n.
Next Table FCML_REP_V
The link between the 2 Tables is the "Cost Estimate Number". Here you also have a way to restrict by Posting Period, Fiscal Year and Currency Type (10 for Company Code, 30 for Group this will depend on your Material Ledger currency setup). If you do not restrict the data, you will get for that same material all accounting periods out there for all your ML currencies.
These should be part of the available selection criteria in your future query.
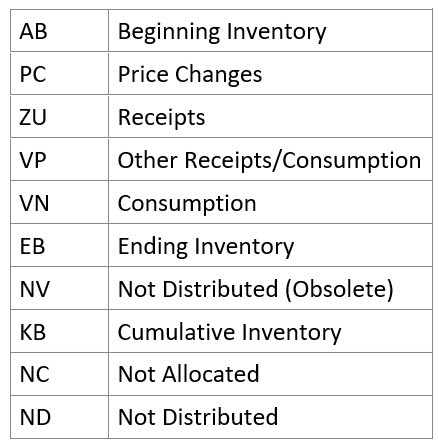
Once you restrict your data, you will see that this table shows the different Categories that you get in CKM3n (Ex. Category AB will represent your Beginning Inventory, ZU - Receipts, ... and EB - Ending Inventory).
Note: Unfortunately there is no check table for the Category list of values as this is a Domain with a list of values. These are the different values
Each Material / Plant combination will have many records for a given period because of the multiple categories. (so eventually they need to be aggregated)
In the example below, you will see side-by-side CKM3n and the corresponding FCML_REP_V record.
You could clearly see the "Total Stock BUn" column representing the Quantity for Beginning Inventory (Category = AB), and the "Total Val" representing the $ amount. Then you can continue with the other Categories like VN - Consumption and EB - for Ending Inventory.
For Ending Inventory (EB) you will need to aggregate (sum) multiple EB records to obtain the Total Value, Quantity and in this case the CKM3n Settlement line (Actual Costing) for ending inventory value, is represented by column "1LvLPrDif". Which it will apply for Beginning inventory for next period. (In my records, I did not have a settlement for beginning as it was my 1st data period).
For Consumption (VN), you will also need to aggregate more than 1 VN record. Again, the Price Difference column or in this case what would show in CKM3n as a revaluation line, will be represented in column "1LvLPrDif".
Finally, the 3rd and last Table FCML_CCS_REP_V
This table represents a deeper level in our CKM3n information. This will give you each of the prior inventory movements categories broken down by Cost Component.
Same as before, the link is Cost Estimate Number. Of course, this table also needs to be filtered by Posting Period, Fiscal Year, Currency type, etc.
You most likely need to aggregate records as you might have several for the same Cost Component and category.
Here you will have in the field "Cost Component" the component code and then you will also have the Cost Component text description already.
This Component breakdown is what you will normally see in the far right of your screen within CKM3n transaction.
In the image below, you will see how in this example the records in Table FCML_CCS_REP_V match the consumption line of the Cost Component 20 (see Table and CKM3n side by side and highlighted).
The Cost component amount is the sum of either PRCDIF_VAR Crcy field or PRCDIF_VAR_S field.
In the case of another Cost Component like 110, is the sum of 2 fields, so you need to include Fxd Value as well. So, at the end, it is better to aggregate and sum both fields for any of the scenarios. This one has a value for Fxd Value (because this component is about fix costs, and the prior example CC 20 was about variable costs).
Now that you have all the necessary Tables that provide CKM3n equivalent numbers, you are ready to build your query. With the help of a good Abaper, he can easily join these 3 Tables and turn them into a new CDS view that ultimately can be turned into an Analysis for Office (AfO) query or he can even encapsulate this into a Fiori App using SAP Web Dynpro. I personally prefer AfO or the old Design Studio that would be easier to drag & drop on a pivot table like navigation. Web Dynpro has replaced it, but I prefer the old one that uses less square footage in your screen.
Not sure if you realize, but all these 3 FCML* tables are also standard CDS views that SAP has built. I just don't understand why SAP has not turned them into a proper report and/or Fiori App yet for Material Ledger reporting. They should do it already !
Note: I said before that one alternative to this could be to use Transaction KKML0. In my personal opinion, should not be something to be used now a days in S/4 HANA (but there is nothing better yet). This uses a really old SAP technology, "Drill-down reporting" which also uses Report Painter behind the scenes (even older ... 😠 ). You could obtain part of the same information, but not with Cost Component. Then when you will try to export it, it results in a tremendous amount of columns because every combination of CKM3n (row & column intersection) will end up as a column. Not really nice at the end.
What needs to be activated for the FCML* tables to work ?
What the Note also says, is that once that in place, KKML0 (Material Ledger drill-down reporting) will be using these series of CDS views. So at the end, my solution is tapping into the same set of Tables. But, if we encapsulate or expose these CDS views to be used in AfO or in a Fiori App, you end up having a way better front-end than the classic Drill-down reporting.
There are quite a few Oss Notes talking about these series of ML tables too.
If your Company and/or Project needs to implement this, or any of the functionalities described in my Blog, or need advise about them, do not hesitate to reach out to me and I will be happy to provide you my services.
Starting from S/4 HANA version 1709 and upwards, SAP introduced a new functionality for COGS (Cost of Goods Sold) split when posting your a PGI (Post Goods Issue) automatic journal entry.
Up until this version and traditionally in SAP ECC version, we would post a 1 liner COGS entry for the total standard cost of the material (* Qty) of the product being delivered to the customer. This was the standard in SAP and has been like that since SAP existed. Many other ERP systems do the same, posting of the Cost of Good Sold entry is done with just 1 line to represent the COGS. Also, when we were using Costing based COPA, we would create as many Value Fields as Cost Components we had and when performing the Billing the system will post into COPA this sort of COGS Split among the different value fields. But from a pure GL posting perspective, this was not yet possible.
Our Journal Entry used to be like below:
Debit - Cost of Good sold (PL)
Credit - Inventory (BS)
Now a days, the recommended approach with S/4 is to use Account based COPA and not Costing based COPA anymore. Account based is the way to go today.
(Note: you can still use Costing based, but it is not the recommended approach anymore for new S/4 greenfield implementations. For the old SAP guys, like me, we grew some grey hair trying to explain the "unbalanced" situations of FI vs. COPA. So, we don't want go back to those days anymore).
By using this new functionality, the system would create a 2nd Accounting Document right after your PGI posting that would offset the original COGS account and Debit your different COGS Splitting accounts that you would have configured to show your different Cost Components that you defined in Product Costing configuration (OKTZ).
Example:
Debit - COGS Cost Component 1
Debit - COGS Cost Component 2
Debit - COGS Cost Component 3
Debit - COGS Cost Component NN
Credit - Cost of Good sold (PL)
Now, the purpose of my posting is not to talk about how to configure this specific functionality. For this, you can find other nice posts that have been written on this topic by colleagues of mine.
The purpose of this post is how to make COGS Split happen when you ship to your customers out of downstream Distribution Centers and/or 3PLs Plants / Warehouses.
When you ship to your customer from your Manufacturing Plant, and you activated COGS Split, it will naturally post your COGS Split.
But, many companies, have a downstream series of Warehouses, Distribution Centers and/or 3PLs that receive their goods from the Manufacturing Plants via Intra Company STO's (Stock Transfer Orders). And, only from there they ship to their customers.
Since these Warehouses were not the ones that manufactured the goods, you would normally don't have Cost Estimates there that would allow you the possibility of having calculated Cost Components to eventually derive that. In that case, you will have to use another Product Costing functionality that will be used when setting up your materials at these Warehouses. This functionality is called "Special Procurement Key for Costing".
With the setup of these key/s, you will specify, from which Manufacturing Plant the Warehouse will pull his costs and with that, it will also inherit the Cost Components Split. So then, when doing the PGI from the Warehouse, the system will have a Cost Component Split in that warehouse and will be able to post accordingly.
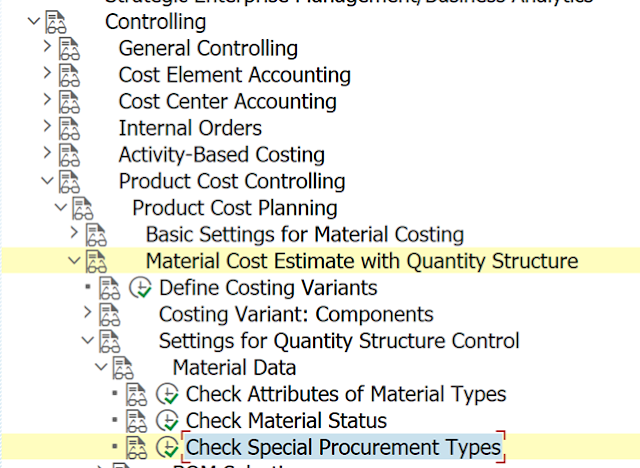
This is how you would configure this Special Procurement Key:
IMG > Controlling > Product Cost Controlling > Material Cost Estimate with Quantity Structure > Settings for Quantity Structure Control > Material Data > Check Special Procurement Types (Tcode OMD9)
Here you will define a new "Key" where you will specify:
Procurement Type = "F" for External Procurement (Plant P001 will get its cost externally from another Plant. By externally, it does not meant from an outside Vendor).
Special Procurement = "U" for Stock Transfer (via STO).
Plant = Ex "CD00" the Plant that it will be getting its cost passed from.
Note: that 1 Special Procurement key will be needed per Plant. So if you have 10/20 Plants retrieving its costs from CD00, you have to configurate this 10x/20x. The good thing is that since it is Plant specific, you can name them all with the same code / key. Ex. each of the 20 Plants will have its own Z1, easier for organization purposes.
One Material, can have its costs derived like this from 1 Plant at a time since this key is assigned in the Material Master at the Plant level. In our case at P001 we will assign ZD.
Once you have this, you will be able to create / assign to your Material Master record this Special Procurement Key in the Costing 1 Tab.
After setting up your Material Master record, the last step you will have to do from now on, is to include in your Costing Run all the downstream Plants for which you configured and assigned Materials to this Special Procurement Costing keys.
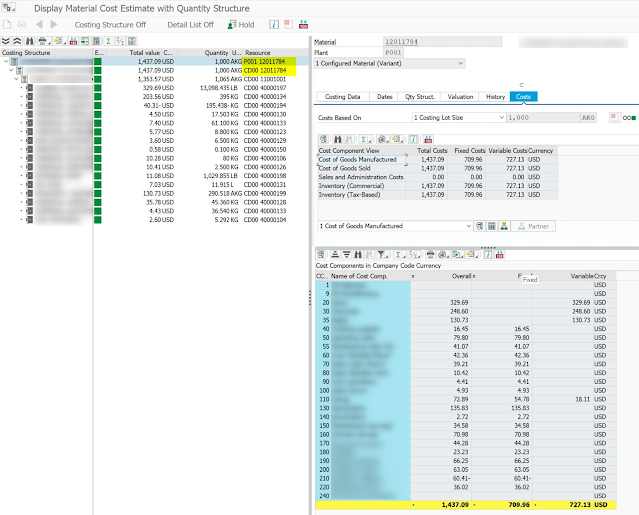
When you calculate your Cost Estimate for a Material, you will clearly see (below in yellow) that Plant P001 is deriving its cost from Plant CD00 (same Material number).
Note 1: You do not need to setup BOM and/or Routings in these downstream Plants to achieve this, just the Special Procurement Key for Costing. BOM and Routing remain necessary only for Manufacturing Plants.
Note 2: In this model, we are not considering any value added like Freight and/or Customs to the inventory value when moving from one Plant to the other, we are staying at the same cost. This can be achieved with other functionalities that are not part of this post.
Now when posting a PGI from Plant P00, you will have exactly the same effect and type of postings that you would achieve as if you were PGI'ing from a Manufacturing Plant and will show the Cost Component Split posting
Material Document for Movement Type 601 - Delivery to Customer will create 2 Accounting Documents.
First Document, posts the traditional COGS posting.
Second Document, posts the COGS Split posting as you defined in your COGS Split configuration but in this case from Plant P001 which is Distribution Plant and not a Manufacturing Plant.
Note: the COGS split configuration is done at the Company Code level, no configuration is required on a per Plant basis. Once done, it will apply to all Plants within that Company Code.
If your Company and/or Project needs to implement this, or any of the functionalities described in my Blog, or advise about them, do not hesitate to reach out to me and I will be happy to provide you my services.
Glossary acronyms : MTO - Make to Order MTS - Make to Stock SO - Sales Order BOM - Bill of Materials
When working with MTO -Sales Order stock, the inventory is held specifically for that Sales Order and valuated as per the original Sales Order costing that happened when you created the Sales Order and Costed it.
Now, if you are working with MTS materials that can become MTO and vice versa all the time indistinctively, this could create a challenge. Why ?
Imagine a Sales Order created 3 months ago in September with certain costing (Ex. $100 /tn) , now you are getting into a new Fiscal Year and preparing your Standard Costing for the next year to come. The result of your new Costing calculation (CK11N/CK40N) gives you $105/tn for the same material.
Once you finish your Mass Costing run and you "release" the new standard, it will revalue your Inventory. But this will only apply to your MTS stock and will not revalue your MTO Inventory "held" inside the Sales Order.
Many of you will tell me that CK55 - Mass Sales Order Cost and CK51N - Sales Order Cost exist, yes indeed they do. But, they will ONLY cost your Sales Order (the document) and you will only see the update after doing the costing in the condition type EK02 of your pricing procedure for that SO line item. But what none of these 2 transactions will do is re-cost the inventory on-hand that you have for that specific Sales Order.
In standard SAP, MTO inventory is supposed to last for a "finite" amount of time and the assumption is that as soon as you produce it you ship it (or shortly after). That way you are not supposed to have on-hand inventory for too long that would require to re-cost this in the event of a Mass recosting exercise (Ex. for a new Fiscal Year to come). So SAP, does not contemplate the possibility of revaluing MTO inventory on hand.
*** This solution will not be applicable for all types of MTO situations, only to customers that move around their products between MTS to MTO and viceversa constantly, which we know it is not the true spirit of an MTO ***
Standard SAP MTO configuration uses Requirement Calss 046 - MMTO config value.
This Requirement class uses Account assignment category M and Valuation M - Separate valuation with ref. to sales document/project. This Valuation M is the key one here that indicates that the valuation is in reference to a Sales Document (Sales Order) or a Project. It also uses Costing ID = B - Automatic costing and marking which makes that your Sales order gets costed and marked automatically behind the scenes when you save it. Costing Variant, specify your specific Sales Order costing variant that you use or configured for Sales Order costing (not the object of this post to talk about Costing variants). In case you use Costing Sheet in your design, you will put it here too .
Finally Costing Method = 1 is for Product costing (based on a BOM) in contrast to 2 Unit Costing.
The rest of the fields are not really relevant for my example and scenario.
Now, with a few tweaks and changes, we can create a new Requirement Class that will make the system behave and valuate your MTO inventory as if you were in MTS. (Needless to say that you will not modify the standard delivered 046 Req Class and you will create a Z or Y one. Golden rule in SAP that you should never break).
This will be the new Req Class for MTO as MTS. (see below in next image)
As you can clearly see, it has been decluttered quite a bit and we do not need many of the prior options.
The key field change here is the Valuation that went from M (Separate valuation with ref. to sales document/project) to A (Valuation without reference to sales document).
Without Val. Strategy also needs to be flagged which will also make the valuation work as MTS.
The rest of the fields are not needed Costing ID, will not cost within the Sales Order anymore as you are using MTS Materials. Costing method, not needed too, can be left blank. Costing Sheet and Costing Variant, either
Now that you have that configured, all your Logistics processes will still behave as if you were in MTO. Your Inventory movements will still need to be done at Material, Sales Order and Sales Order line item as before. But, from a Financial valuation point of view, these will be handled from now on as MTS.
When you will display your Material Price Analysis (CKM3), in case you are using Actual Costing it is more relevant this Tcode, you will not have to enter the Sales Order stock option to display your inventory value, as the inventory is all handled as if it were an MTS from the Accounting point of view. Logistics wise you will still see it as MTO (Ex. in Material Documents and MM related reports).
Material valuated as MTO with Special Sales Order stock (before)
Material valuated as MTS but for MTO Sales Order (after)
Below you will see the line item of the Sales Order displaying my new Requirement Type ZKEM on the line item of the "Procurement" tab.
Remember, your Material Documents and movements will still need to be done and reference a Sales Order Line Item, but Financially it will not and all the inventory is going to be bundled together with your MTS stock from a Finance valuation point of view.
If your Company and/or Project needs to implement this, or any of the functionalities described in my Blog, or advise about them, do not hesitate to reach out to me and I will be happy to provide you my services.
I decided to publish this Blog post because I could not find anywhere else on the Internet any other post for a scenario like the one that I will describe here.
There are several posts on Activity rate Actual calculation out there, but none of them is using an "Splitting Structure" for multiple activity types withing the same Cost Center. All of them are based on the assumption that 100% of the Cost (rate) of the Activity type covers 100% of the Costs incurred in the Cost Center.
This post is going to describe how you setup an Splitting Structure when the incurred costs of a Cost Center are represented by several Activity Types at the same time.
Ex. If you look at the "T" Account or a Cost Center report for a given Cost Center and you have 30 different Cost Elements (GLs) expenses being posted in that Cost Center.
Normally, you would have 1 Activity Type (& rate) that will represent the entire 30 expense accounts and that will offset 100% of those costs when doing Activity confirmation. That Cost Center will receive credits from it that should offset the entire Cost Center costs.
But ... in certain cases, business do not want to have 1 Activity Type (rate) to offset those 30 different expenses, they want several ones 2, 3, or even more Activity Types within the same Cost Center. In that case, the usage of the Activity rate actual calculation, would require you to setup a "Splitting Structure" to be able to achieve this and have the actual activity rate calculated properly within that Cost Center.
You will start by defining a "Splitting Structure", follow the IMG path above.
First, create "Splitting rules" where in this case we will split based on "Activity quantity".
Then create a "Splitting Structure", Ex. Z1 too.
Note: Part of the descriptions are masked for confidentiality reasons.
Then create 1 line per Activity Type that you will have within that Cost Center. In my example above, I had up to 7 Activity Types within the same Cost Center that I needed to split and take into consideration for my Actual Activity rate calculation.
When you create each line, you assign them the Splitting rule that we created before that was based on Activity Quantity.
Once the line created, you go one level deep and create the "Selection for assignment".
This is where you will establish which Cost Element/s range or group will represent a given Activity Type. You also need to specify which Activity Type goes with for this assignment combination.
In this example, I had a CE group ZS_LUNLAB that goes with LUNLAB Activity Type.
By doing this, when running the calculation, the system will "pair up" the Actual expenses of those CE's in that group with the total costs posted / offset of that Activity Type to be able to later calculate the actual.
Once you have this configuration completed for the several Activity Types, your Splitting Structure configuration is completed.
Activity Type Setup
The Activity Type needs to be setup in a specific way for actual calculation
Tcode KL1, 2, 3
The Activity Type needs to be setup with "5" to be able to calculate the price automatically.
Version configuration
You need to configure your CO - Version accordingly per Fiscal Year (FY) to be able to have the Actual Activity price working as well.
"Revaluation" fields needs to be setup with either 1 or 2 option, 0 will not revalue.
1 - The differences between allocations valuated with plan and actual prices are posted under a separate transaction (actual price calculation). - Like a Delta posting
2 - All actual activities revaluated with the actual price; original allocation changed. The differences between allocations valuated with actual and plan prices are not shown with this option.
Execution
We will start by running a Cost Center report to understand what Actual debit expenses where posted during the month at my specific Cost Center and what were the Activity Type credits that were posted as a result of the Activity confirmations derived from my Production execution.
Because of given business reason, we had 1 Cost Center that "concentrated" all the expenses and with allocations from many different Cost Centers we were posting the Debits into this one Concentration Cost Center. All the Activity Types were also assigned to these 1 Cost Center too. Thus, 1:1 relationship that you can easily see here in my Cost Center report. This is only an example, and it is not always that straight. In many cases, you will have 5/6/7 Cost Elements, for a given Activity Type offset.
As per the Cost Center report, you could see that the total expenses posted were $34,273.33 while the Absorption Credits posted by the Activity Types confirmations, where $33,623.33 and were not able to 100% offset the actuals (by $650).
For this, we will calculate Actual Activity rate calculation that will recalculate all the Activity rates to be able to fully offset those actuals and end up with the Debits equal to Credits on the Cost Center report.
1st step before doing the calculation, we need to do a 1 time (per Fiscal Year) setup to assign the previously configured Splitting Structure to my CN599 Cost Center, so the system knows to which Cost Center this Splitting Structure will apply (it can be more than 1 Cost Center too if it applies).
Execute Tcode OKEW and assign it.
It says "All versions" but we are only doing it for version 0
Once done, SAVE and the assignment is completed. You need to repeat this every FY.
The Actual Activity Type calculation is a 2 step process. First, you calculate and second you post the newly calculated transactions with the new rates.
1st step - Tcode KSS2
Enter the Cost Center that you want to split & recalculate, period, fiscal year for calculation and execute.
If you look at the total results, you will easily recognize those numbers from the previously executed Cost Center report.
Control Cost & Actual Costs columns represent all my Cost Center Debits.
The Actual Cost Balance column, represents the Total Credits done by the activity type postings.
Allocated Actual column, represents the difference that I still need to allocate.
Then within the lines of this report, you will find all the different Activity Types that were posted during the month with their corresponding actual quantities. If your Splitting Structure was properly mounted, your Allocated Costs will properly reflect the right proportional amounts on each line.
Make sure your Structure covers 100% of Cost Elements involved in the Cost Center and 100% of the Activity Types that credited that Cost Center. If for any reason, the structure has a "hole" and does not covers 100% of any of these 2, then your numbers are not going to be properly calculated for all the Activity Types, not just 1. So this is really important.
As a suggestion, in the Splitting Structure when doing the assignment configuration, I strongly recommend you to work with a CE group. This way, you can easily add new CE's in the group without the need of a configuration, transport, testing and the whole bureaucracy of changing configuration on a Production system.
Once this step executed (without test mode), you are ready for the next step which is the Posting.
2nd step - Tcode: KSII
Actual Cost Center postings showing that during the month we only had 0.144 Qty for this LUNLAB Activity Type.
Note: If you are using Actual Costing, the allocation cost element from an Assessment like 9042119 needs to be added to the corresponding Cost Components Structure (OKTZ) even if they are not being used for Costing. (This is only applicable in case you are using Actual Cost Component Split, like in my case)
Calculation Result of KSII (done in test mode in my case)
New determined rate for LUNLAB is $ 73,321.74
Total Costs in the Cost Center to offset $ 10,558.33 (show in prior reports)
Total Activity Qty occurred in period 0.144 hr.
10,558.33 / 0.144 = 73,321.74 is (will be) the new rate calculated by the system for LUNLAB
Note: My numbers are really odd because I did not a lot of activity type quantities posted to be able to end up having a rate that would make sense, but you have to follow the math.
Now If I were to remove the "test mode" the system will go back to every single Production Order that had this LUNLAB (and other Activity Types too) and repost everything at the new rate instead of the standard rate that I had from KP06.
To be able to properly determine Actual Activity Type rates, having 7 different Activity Types within the same Cost Center and them being covered by a series of different Cost Elements, is only possible by setting up the Splitting Structure in the way that I described before; otherwise it will not be able to "split" your costs properly among the different activity types.
If your Company and/or Project needs to implement this, or any of the functionalities described in my Blog, or advise about them, do not hesitate to reach out to me and I will be happy to provide you my services.
I recently run into this while testing the new Fiori App "Production Cost Analysis" and wanted to share it with the community.
This new Fiori App, has a somewhat "weird" or new way to deal with Order statuses as we were used to in the past when we would display them in GUI (Ex. CO03).
If you see my 1st screen capture, my Production Order 10004582, shows with status "Closed" in the Fiori App. Which for me it was an issue right away when I saw it, because I knew I did not Closed (CLSD) this Order yet.
If you display this same Order number in GUI Tcode CO03 (2nd screen capture), you can clearly see the highlighted Order statuses as being REL - Released and DLV for Delivered. But nowhere in the Order statuses you will see CLSD - Closed.
Is the Fiori App working properly ? YES
Is this some sort of bug in the App that needs to be reported and fix ? NO
Is there any OSS Note that fixes this issue ? NO
No, this is not a bug and the Fiori App is working properly (as per SAP design).
According to OSS Note 3295371 ( APP F1780 "production cost analysis" doesn’t show correct order status ), this works as intended. It considers the status DLV - Delivered that the order has been completed and therefore is Closed as in the Fiori App.
Being used to the traditional Order statuses, this makes me a lot of noise and is a bit misleading as in the backend the order is not even TECO - Technically Complete yet, and the Fiori App already shows it as Closed.
This could lead to several issues and impacts if not understood properly.
No TECO in the orders. Orders could remain in those statuses for ever. You will need to use other reports to make sure the shop floor people TECO them. (I know you should not use this report to analyze order statuses, but still the mismatch is what bugs me ...)
Same case for real CLSD - Close that should be put in the Orders after a period of time.
I find it weird, but I guess that only for the purpose of analyzing "Production Variances" a DLV status means no more work on the order. But from a technical point of view, this status will not prevent the shop floor from continuing using the order and book costs against it if they want.
Below is the OSS Note and an extract of it where it explains this situation.
OSS Note 3295371 - APP F1780 "production cost analysis" doesn’t show correct order status
https://me.sap.com/notes/3295371
Please compare order number XXXXXX (Status ID = REL) in the system. In SAP GUI (t-code COOIS, CO02/3, COR2/3, etc.), the manufacturing order has more statuses which some are relevant and others aren't relevant for the FIORI app (usually CRTD->REL->PCNF->CNF->DLV->TECO->CLSD etc.).
In the Fiori app, the manufacturing orders with the 'Released' status [REL] (or partially released [PREL]) but not 'Delivered' [DLV] or 'Technically Completed' [TECO] or 'Closed' [CLSD] statuses are considered as 'OPEN.' The orders with DLV, TECO, and CLSD statuses are considered CLOSED in the Fiori apps.
The order gets OPEN since it's released, and later it gets status CLOSED once TECO, DLV or CLSD status is set. These two statuses: OPEN and CLOSED, are available for selection in the smart filter dropdown box (Open, Closed, Open and Closed).
If your Company and/or Project needs to implement this, or any of the functionalities described in my Blog, or advise about them, do not hesitate to reach out to me and I will be happy to provide you my services.
The days of using SE16N (or even the old SE16) should be over now and you should now embrace the new evolution of it. The new SE16H !!! "H" for the HANA database era and capabilities.
This new version (SE16H) offers grouping capabilities, sorting, aggregation (like COUNT for counting records) and one of the most important one, JOIN capabilities. Now you can JOIN other tables to retrieve the content or descriptions that you can find in other satellite tables or Header to Line items relationships in one big Query / Result instead of jumping from one to another.
In the past we used to execute several Queries with SE16N (or SE16 for the old folks), download to Excel and then VLOOKUP those values to join them and or get descriptions. Now you can do all of that directly in SAP with SE16H in one step.
QUERY
This Query will allow you to quickly understand and give you more information about all your FI-MM account determination from your system by providing GL account descriptions and Valuation Classes names,
FI-MM Account determination configuration can be found in Table T030.
Once in SE16H, go to "Outer Join Definition" and create a new one. Provide a Name and a Name / Description.
Then add Table SKAT - GL Account Master record descriptions by clicking the green add icon with the "+" on the 1st table for "Definition of Secondary Tables".
Once added click on the "Output" icon (same as the Multiple selection icon for reports). This will allow you to select which fields you want to output from your "joined" SKAT table in your final query results. Accept and you will go back to the prior screen.
Then on the 2nd part of the screen (Selected Secondary Table) you have to enter the different fields that you need to join both tables. In our case, I am looking to display the GL accounts descriptions / names that I have in Table T030 as there is no way that I would know them by hard by just looking at T030 directly, and there are quite a few of them.
Enter SAKNR on Table field, select Method "Reference" (as you will reference / join it with the value of table T030), Reference field KONTS (GL account) from Table T030 then Table T030.
Add 2 other lines for KTOPL (Chart of accounts code), but in this case it will be as a "Constant" and value 0001 as my Chart of Accounts is 0001. Note: don't put this value as '0001' or you will get an error in your query, you do not need the colons for a constant as you would do while writing code.
Then add SPRAS (Language) as you are bring Text descriptions from a Table (SKAT) that is language dependent. In this case E for English and not EN. E for the technical unconverted value for English language. If you are not sure of your language technical value, display SKAT first in a separate SE16H window to know yours.
Finally, I want to add a 2nd table that will show me the Valuation Classes descriptions, as there are several and you do not always know them all by hard. Follow the same process but in this case for Table T025T (T for Text table for original table T025 Valuation classes).
Save your "Join Conditions" and then go back to SE16H main screen and select your "Outer Join Definition" name that you just created and Execute.
You can also select which fields you want to output from T030 in this main screen too. Then you can save your "layout" and re-use it next time in conjunction with your Outer Join definition.
At the end, after adding the 2 tables for GL account and Valuation Classes descriptions, your end result will show you all the T030 records with their corresponding descriptions for GL and Valuation classes. This will help you understand your FI-MM Account determination in a better way.
PS.: It is a shame that we do not have a table to get the descriptions for the field "Transactions" / KTOSL that would tell us what BSX, GBB, PRD, WRX, etc mean that we could add here too. But as an SAP Consultant, we need to know them or have proper notes / documentation with their meaning and usage.
If your Company and/or Project needs to implement this, or any of the functionalities described in my Blog, or advise about them, do not hesitate to reach out to me and I will be happy to provide you my services.
Recently, while doing a banking implementation with a US bank, I run into an issue that never had before. It caught my attention and thought it was worth sharing it because it is quite specific that I am sure it is going to benefit someone.
I was doing payment files testing with a US Bank (a really big one) for my client's US and Canadian operations and because my client also operates in the province of Quebec, Canada (where we also speak French); we run into some particular issue because we have data with French accented characters.
It is really common in the French language to have accents on people's name, streets and companies too. But this bank's systems where not able to handle and read our files because of this "special characters / strange characters". Many times bank's systems are so antiquated that they are still running mainframe servers that were conceived in the 80's easily. Many of this servers and operating systems do not have the ability to handle some of this characters and even had a complete different code page too. In some of this cases, since we were passing them ASCII files (as per their request), their systems were not interpreting these characters and adding an extra space to the line record. This was making the record longer and therefore failing.
These are some of these "special characters" (Ex, À Á Ã È É Ê Ì Í Ò Ó Ô Ù Ú Û à á â è é ê ì í î ò ó ô ù ú û ).
Now there are 2 different scenarios that I had where I needed to remove this special characters, one without code and another one with.
# 1 - DME file creation (Ex. Electronic Payments, Positive Pay or any type of Banking file)
#2 - Check printing
# 1 - DME file creation
In this scenario we were creating 2 different types of files for this bank, an ASCII Positive Pay file and an XML ISO 20022 payment file. The ASCII one was the one that the bank was not able to process properly.
In order to remove the 'special characters' on the DME file, you just need to flag one option on the corresponding field and the DME engine will take care of the rest.
Ex. I want to remove the 'special characters' from the Vendor Name (PayeeName1 field in my DME) that is part of the output file.
Select the Field name (Element or Atom) and click on the "Conv.Function" icon. You will get a pop-up like this one (see below).
Here you have a series of options to right justify or left justify your characters. Then on the 2nd part, you have the option "Replace National Chars". This option will allow you to replace these series of "accented" characters by no accented ones by executing a standard FM behind the scenes. (which opens the door to talk about my option #2).
#2 - Check printing
I mentioned that the output file was related to Positive Pay, so in this case, we needed to have a exact match file vs. printed check otherwise the bank was going to reject our checks. So, we also needed to adjust our check forms so that the printed names do not have these accented characters either.
To do this, we will be using the exact same Function Module that is available in the DME engine, but in this case calling it via code.
FM SCP_REPLACE_STRANGE_CHARS
You can test it here to see the results before incorporating it in your code.
Here you will see how in the Input text I put all sort of accented characters and the FM returned all the same characters but without accents. The same can be executed in your forms or any other Abap program to remove these characters.
Bonus track ...
You can also use program RSCP0155 that has a selection screen where you can play with more sophisticated options like input and output code page and range of Unicode characters. Then this selection screen will end up executing this same FM and returning all the input characters and converted characters for the whole ASCII code. So you can see upfront what your characters will look like after conversion.
Part of this Post is based on OSS Note
1062237 - Transliteration of characters with SCP_REPLACE_STRANGE_CHARS
(requires a valid SAP Marketplace ID to display the Note)
If your Company and/or Project needs to implement this, or any of the functionalities described in my Blog, or advise about them, do not hesitate to reach out to me and I will be happy to provide you my services.
I decided to write this blog post because over the last 2 years or more, I have been working on a number of projects / clients where I had to take over or use North America SAP Banking configuration of prior SAP consultants (in many cases "just configurators"). Unfortunately, I have seen a series of recurring mistakes being done by the majority of them because of the lack of knowledge of the North American banking system and common practices (for USA and Canada). Many of these consultants were either local or offshore and from different Big 5 consulting / implementation partners and some smaller SI's as well.
These series of recurring mistakes are due to the lack of knowledge of what it is a "Bank Key" in SAP or what it should be and what it is used for.
Bank Keys in SAP are used for two different things and places:
Identify our own House banks where our own (Company's) bank accounts are registered / created
Pre-requisite piece of Master Data information to be able to register Banking information for either Vendors and/or Customers to be used for Electronic Payments.
Bank Keys in SAP are created by country and their number will depend on certain rules and conventions that are specific to that particular country that you are creating the bank key for. One country will not use the same Bank Key and naming convention than another country. It will all depend on that country's Financial System. The Bank Keys are then going to be used to be able to perform and route electronic payments, if you do not create your bank keys properly, your electronic payments will not be routed properly or will be rejected by your bank because you are not providing the right and expected information to your bank.
Canada Bank Keys
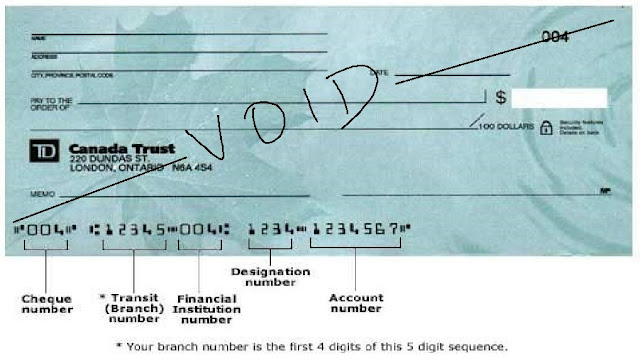
Canadian Bank keys, look similar to US bank keys, but are completely different one to another. Canadian Bank keys are made of 2 different pieces of information, the first 4 digits represent the Financial Institution number assigned in the Canadian Banking / Financial system with a leading zero.
Ex.
0003 - Royal Bank of Canada
0004 - TD Canada Trust
0001 - Bank of Montreal
0010 - CICB - Canadian Imperial Bank of Commerce
0002 - Scotia Bank
0006 - National Bank of Canada
What is a Routing Number?
A routing number identifies the financial institution and the branch to which a payment item is directed. Along with the account number, it is essential for delivering payments through the clearing system.
EFT Routing Number
An Electronic Fund Transactions (EFT) routing number is comprised of a three-digit financial institution number and a five-digit branch number, preceded by a "leading zero".
Example : 0XXXYYYYY
0 : Leading zero
YYY : Institution Number
XXXXX : Transit / Branch Number
The electronic routing number is used for routing electronic payment items, such as direct deposits and wire transfers.
Example of an SAP Bank Key record for Canada
As you can see, they are created by Country Code (Ex. CA, US or MX). Then the Bank Key is numeric for Canada as described above.
Then you have the Bank Name and address information, SWIFT Code (8 or 11 long) and the Bank Number for Canada is equal to the Bank key number entered.
The Bank Key should never be defined as the "SWIFT Code", there is another field to define the SWIFT code.
Below is a Void cheque image for a Canadian type of cheque where from there you will be able to pick the right routing information for a given Bank Account or Vendor information for you to properly create in SAP to ultimately execute electronic payments.
USA Bank Keys
The routing number (a.k.a. RTN or routing transit number) is a 9-digit number that serves to identify the specific financial institution responsible for the payment of a negotiable instrument.
In same cases in the US it is also called ABA routing number (American Bankers Association #).
Where is the routing number on my check?
The sample graphic below shows where the routing number can be found in the bottom left corner of your checks.
Routing number format
The routing number consists of 9 digits:
The ABA Routing Number is of the form XXXXYYYYC
XXXX is Federal Reserve Routing Symbol
YYYY is ABA Institution Identifier
C is the Check Digit
Read more about the Routing number at Wikipedia website.
Example of an SAP Bank Key record for USA
What is a SWIFT Code?
SWIFT code (also known as ISO 9362, SWIFT-BIC, BIC code, SWIFT ID or SWIFT code) is a standard format of Business Identifier Codes approved by the International Organization for Standardization (ISO). It is a unique identification code for both financial and non-financial institutions. (When assigned to a non-financial institution, a code may also be known as a Business Entity Identifier or BEI.) These codes are used when transferring money between banks, particularly for international wire transfers, and also for the exchange of other messages between banks. The codes can sometimes be found on account statements.
The SWIFT code is 8 or 11 characters, made up of:
4 letters: Institution Code or bank code.
2 letters: ISO 3166-1 alpha-2 country code
2 letters or digits: location code
if the second character is "0", then it is typically a test BIC as opposed to a BIC used on the live network.
if the second character is "1", then it denotes a passive participant in the SWIFT network
if the second character is "2", then it typically indicates a reverse billing BIC, where the recipient pays for the message as opposed to the more usual mode whereby the sender pays for the message.
3 letters or digits: branch code, optional ('XXX' for primary office)
Where an 8-digit code is given, it may be assumed that it refers to the primary office.
Business Partner
Once the Bank Keys have been created in Tcode FI01 (Create) 02 (Change) 03 (Display) or in Fiori App "Manage Banks", they can be used in the assignment and definition of our own House Banks and also for Business Partner (Vendor / Customer) Banking data under the "Payment Transactions" BP tab.
A given Business Partner can easily use the same Bank Key as our own House Bank if this BP also has a Bank Account at our own same Bank branch. In that case, you do not need to create a 2nd bank key, as we are talking about the same record that will be used in both scenarios.
As you can see in the image below, Bank Key CA - 000300002 needs to be previously created before being able to assign it to Business Partner 1000009. (In some cases, it can be created while doing the BP creation but you still need to provide all the same Data (Ex. Country, Key, address, SWIFT, Bank Number).
Common Mistakes done creating Bank Keys
When defining Bank Keys, I have seen several mistakes done by SAP resources that have all sort of downstream impacts in the system configuration and later on while interacting with the Banks:
Defining the Bank Key using a SWIFT code
Defining the Bank Key as consecutive numbers
Thinking that the Bank Key that is used by the House Bank is different from a Business Partner Bank Key
Modifying SAP standard country settings to force bank key of a different length or type (alfa or numeric)
Defining the Bank Key using a SWIFT code - A NO, NO !!!
Not knowing what should be the Bank key or what a bank key looks like for a given country, has led to many SAP Finance resources to define them using the SWIFT codes as if it were the Bank Key. This in most, if not 100%, of the cases is never correct. The Bank Key is normally used as a key piece of routing information by the banks to execute payments and most of the standard DMEE's (Electronic Payment files) map and use them at a certain point inside the DMEE.
If instead of providing a numeric Bank Key, we provide the SWIFT code, then the bank will reject our payments and we will not be able to pay vendors.
Below you will see a screenshot of a configuration done by a Consultant from a Big SI (really big) that because he/she did not know how to define properly a Bank Key for our own House Banks, he/she had to end up hardcoding in the DME config the Bank Key because the Bank was rejecting their payment files. Standard SAP DME config passes the Bank Key created in Tcode FI01 (Table BNKA), this was due to him/her using the SWIFT as Bank Key for the House Bank, which is absolutely wrong.
He/She ended up harcoding and putting a DME condition (IF) based on the country, to pass a constant. That should have been the Bank Key that is is "hardcoding here" if he/she should have done it properly from the get go.
Defining the Bank Key as consecutive numbers
At another client, I have seen Bank Keys being defined as consecutive numbers (Ex. 1, 2, 3, 4 ...) without any logic and without respecting what it should be used for that Country as per the Bank Financial System. This will also generate an issue like in the above previous example when passing routing information to the bank in the DME files resulting in payments being rejected.
Thinking that the Bank Key that is used by the House Bank is different from a Business Partner Bank Key
As mentioned before, Bank Keys for House Banks and Business Partners (Vendors / Customer) are and should not be different from one another. They are a piece of Master Data (Bank Master) that can be used by either of them.
At this other customer, the consultants did not advise the client properly, and the client was defining a series of Bank Keys for own House Banks and another one completely differently for Business Partners. This is another big mistake, also done by the same Big SI.
Modifying SAP standard country settings to force bank key of a different length or type (alfa or numeric)
I have also seen in some of these prior customers, that these SAP resources have modified standard SAP delivered country settings (Table T005) to force and allow them to entry Bank Keys that are different in length to the one that is supposed to be entered for a given country or to enter alphanumeric Bank keys when the Key should be numeric.
Modifying SAP standard delivered country settings should be a "NO-NO !", unless you really have a compelling reason to do so. While working with some Banking Directory Services, you might have to do it, but in most cases it is part of the instructions that they provide you; so you have proper justification for it.
Data Migration for Bank Keys
Bank Keys are a pre-requisite Master Data object before being able to create Business Partners, in that you are planning to perform electronic payments to Vendors / Customers (BP's). You need to build and have this data prepared and loaded before starting to create Business Partners.
Also, our own House Banks will need to have these specific Bank Keys created previously so then you can configure the House Bank/s (in Tcode FI12_HBANK). So you will need them as part of your configuration. Normally these are just a few (3, 4 or 7, 8 records) that you can create them manually or you can build yourself a small LTMC file just for your configuration.
S/4 HANA Data Migration Cockpit has a standard Data Migration object called "Bank Master" that can be used to migrate these Bank keys, either for your configuration or for your BP's. In most of the cases, you will end up with 2 different files. 1 small one for your config that you will also have to upload before you transport your House Bank and migrate (upload in S4) your Bank Accounts and then a 2nd file which should be bigger that will contain all the Bank Keys needed for your BPs, as they are a pre-requisite.
Understanding this is really key to have a successful Data Migration approach for Business Partner Bank Keys that should be completely different for the Bank Keys associated to your House Banks. Unfortunately, I have also seen a lot of people confusing them.
Banking Directory Data services
Dealing with Bank Key Master Data and having clean Bank Keys data is key in case you want to implement Electronic Payments in SAP and avoid payments being rejected. Collecting these info from your Vendor (or Customers) should be part of your Business Partner creation process, but if you are doing it for the 1st time, collecting the data from them and also having the Bank Keys uploaded in the system could be quite an effort.
Having payments being rejected by your bank, will cost you money as banks charge you for rejected payments and also could create issues with your vendors because they will not receive your payments on time and eventually they could cut services or goods delivery if you do not pay promptly.
There are certain companies and services out there in the market that can sell you Bank Directories that can be uploaded in SAP and will be ready to consume. Same as you would upload the Data with the Data Migration cockpit or maintain it manually.
Some of these services, are quite costly, but really convenient.
SWIFT Bank Directory: quite expensive but so far the best one and easy one that I have used. Comes with a file ready to load in SAP with standard SAP Bank directory upload program. They provide Worldwide financial institutions information, not just for 1 country.
Accuity Bank Directory: expensive as well but require the installation of custom Abap programs to upload in SAP (provided as transports by them). Their information is not that easy to deal and upload compared to SWIFT. They also provide Worldwide financial institutions information.
Canadian Payment Association (CPA): Their service is called "Financial Institution branch directory". I have not used it for a while, but they used to have a file ready to be uploaded in SAP with standard programs, same as SWIFT. They seem to only provide Canadian banks info, not worldwide as SWIFT or Accuity.
If you are looking to find some individual Bank Routing information for free out there on the Internet, there are some pages that give you (one at a time) information that you could use as Bank Keys info for Canada and US.
http://canada-banks-info.com/
https://us-banks-info.com/
Defining your Bank Keys properly is KEY for your House Bank configuration and your Electronic Payment setup in SAP and ultimately for a successful banking implementation.
Consultants that have the right banking knowledge for the country and market that you are trying to implement is vital for this. Not all consultants know about this and end up taking the wrong decisions that have many ripple effects down the road. In the majority of those cases, those consultants never stick around long enough to see the unintended consequences of their lack of knowledge and experience in the subject.
If your Company and/or Project needs to implement this, or any of the functionalities described in my Blog, or advise about them, do not hesitate to reach out to me and I will be happy to provide you my services.