In today’s competitive business environment, organizations need real-time cost transparency, accurate inventory valuation, and streamlined financial reporting to stay ahead. This is exactly where the SAP S/4HANA Material Ledger comes into play.
As a powerful tool for multi-currency valuation, profit analysis, and integrated accounting, it helps businesses gain deeper insights into their production and sales costs while ensuring compliance with global standards.
In this post, we’ll explore the key features, major benefits, and real-world business scenarios of SAP S/4HANA Material Ledger in simple, easy-to-understand language so that both finance professionals and business leaders can maximize its potential.
Note:
To get the most value from this topic, we recommend reading this full blog post and watching the embedded YouTube video below.
The post provides structured insights and practical examples, while the video offers a visual walkthrough to reinforce key concepts. Together, they deliver a complete learning experience for SAP professionals
Video: SAP S4HANA Material Ledger Features, Benefits, and Real Business Scenarios
1) Why Material Ledger Activation is mandatory in S4 HANA.
In today’s complex global business landscape, companies frequently operate across multiple countries—each governed by its own financial, tax, and legal regulations. As a result, organizations must manage parallel valuations, where the same material or inventory must be valued differently based on varying accounting principles, such as International Financial Reporting Standards (IFRS) and Local GAAP. For example, a business may use standard price valuation for IFRS while applying moving average valuation for local compliance—all for the same material.
Moreover, multi-currency valuation becomes equally essential when transactions occur in one currency, reports are generated in another, and statutory accounting is required in a third. A global enterprise might procure materials in USD, manage operations in EUR, and report in the local currency of its subsidiaries. This complexity requires a robust solution to handle real-time, accurate, and compliant multi-currency valuations.
Parallel Valuation, Multi-Currency, and Material Ledger Are Essential in today’s Global Business Operations.
The Material Ledger is the basis of actual costing. It enables material inventories to be valuated in multiple currencies and allows the use of different Valuation approaches.
Let’s understand this in simple terms.
2) How to Understand Material Ledger in SAP S/4HANA.
To understand the material ledger , we need to understand the Sub-Ledger, General Ledger (GL), Trial Balance & Balance sheet.
2.1) What is Sub-Ledger
To understand the material ledger, we need to first understand the Sub-Ledger.
--> In order to understand Sub-Ledger, we need to first Understand the Basics of SAP Financial Accounting: General Ledger, Trial Balance & Balance Sheet.
2.1.1) General Ledger (GL)
In simple terms, the General Ledger (GL) is the main financial record of a company. It keeps track of all money coming in and going out, recorded as debits and credits. This is the backbone of any company’s financial accounting system in SAP S/4HANA.
2.1.2) Trial Balance
To make sure everything adds up correctly, companies use something called a Trial Balance—which is just a report showing the closing balances of all General Ledger accounts on a specific date. If the totals match, it confirms that the books are accurate.
2.1.3) Balance Sheet
The Balance Sheet then uses this data to show the financial health of the business at that point in time—listing what the company owns (assets) and owes (liabilities).
2.2) Concept of Sub-Ledger
Once you understand these core financial concepts, the next step is to explore the Sub-Ledger, which sits just below the General Ledger.
Sub-ledgers track detailed transactions for specific areas like customers, vendors, or assets. These transactions are posted either directly or through automated journal entries from integrated modules like SAP FICO, MM, or SD.
Material Ledger/Actual Costing is a Sub-Ledger like AP, AR, Fixed Assets
Picture: Material Ledger is a Sub-Ledger
3) Functionality of Material Ledger
Below are the main functionalities of material ledger.
Inventory Valuation/revaluation
Visibility of Price changes
Updating Standard Cost with Actual Prices (optional)
Periodic Unit price.
--> In simple terms, the Material Ledger in SAP S/4HANA is a tool that records all transactions related to materials—whether it's purchasing, receiving goods, price changes, or consumption during production.

--> Material Ledger keeps track of how much materials cost and how they are used, while also supporting multiple currencies and different valuation methods (like standard price or actual cost).
3.1) Actual Costing
Actual costings means inventories are valued at Actual Cost based on the Actual Costing Runs.
Here inventories are valuated at actual cost means Materials are valued at Standard Price which is then adjusted to reflect the difference between the preliminary price and cost.
In Material Master accounting tab, the value of the field “Price determination” determines the actual costing.
Picture: Price Determination in Material Master
Since our material is having price determination as 2 (Transaction based) as shown in the above screenshot, the price difference gets posted to FI and will not participate in inventory valuation at actual cost.
--> Looking at the material as shown in the above screenshot, for our car business Material Ledger is active but actual costing is inactive
Picture: Material Ledger Functionalities & their usage for our car business
3.2) Multiple Currencies & Valuations
The Material Ledger is a powerful functionality in SAP S/4HANA that enables parallel valuation of inventory in multiple currencies and accounting principles.
--> Material Ledger allows businesses to record, manage, and report material movements and inventory values across different valuation views (legal, group, and profit center)

--> Material Ledger supports up to three currencies for each material document.
For example : In the below screenshot a material is shown to have price in three currencies
Picture: Material Price in three currencies due to Material Ledger Activation
If a transaction is posted in CNY, we can see the FI document in all the three currencies.
In the below picture, it is shown how Material Ledger makes possible multiple currencies along with multiple valuations.
Picture: Multiple Currencies along with Multiple Valuations
With Material Ledger, organizations gain real-time visibility into inventory costs, currency fluctuations, and financial impacts—ensuring transparent and compliant financial reporting across all jurisdictions.
In the below section, we present real-world business scenarios that illustrate the practical relevance of the three valuation views available in the SAP S/4HANA material master.
These views—legal, group, and profit center—enable organizations to assess material values from different financial perspectives. The Material Ledger supports up to three currencies per material document to ensure accurate valuation across multiple reporting requirements, such as local statutory compliance, group-level consolidation, and internal profitability analysis.
This multi-currency capability helps businesses maintain financial transparency and consistency across global operations
4) Real Business Scenarios
Imagine we have a multinational business which operates in Canada, Singapore & USA. This business has a company & Plant each in Singapore & America and Headquarters in Canada.
This business sends semifinished materials from Singapore company to USA company on an intercompany price which include a small profit margin for SG company. USA company does further operation and sells the finish materials to the customers in USA.
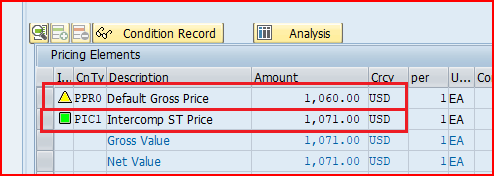
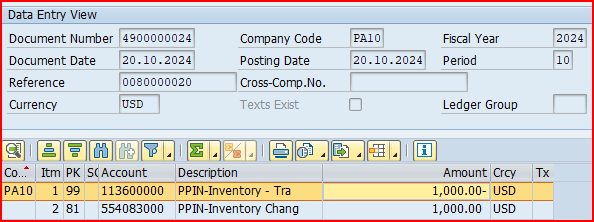
4.1) Business Scenario 1 – Legal Valuation
This scenario involves legal reporting. Company A sells to company B in selling price of 120 Singapore Dollar with Company A cost of 100 Singapore Dollar. It means Company A profit is 20 Singapore Dollar. So business wish – while doing legal reporting in each country, system should automatically prepare the report as per the local country rules & regulation and as per the local currency. In the above example – while reporting this transaction in the USA legal reporting, system should report inventory cost in USA company as equivalent of 120 Singapore Dollar converting into US Dollar.
Statutory reporting in local currency. Required for tax and legal compliance.
Picture: Legal Valuation in a Transaction
4.2) Business Scenario 2 – Group Valuation
When semi-finished goods are sent from SG to US the transaction is booked in Singapore company in the currency Singapore Dollar and simultaneously the inventory received in the US plant (including profit margin of SG company in currency SINGAPORE DOLLAR) should be converted from the Singapore Dollar to the US DOLLAR and then booked in the currency US DOLLAR.
This business has below wish
Group valuation should be prepared automatically as per rules & regulations. For example -While doing the group valuation, the internal profit margin of 20 Singapore Dollar should be eliminated. This is to ensure that the group’s consolidated financials reflect only external profits.
Since group headquarters is in Canada, so while doing group reporting, company is using currency CANADIAN DOLLAR. So, it is a natural wish that all the transactions happening in the different countries/between the different countries, should be converted to CANADIAN DOLLAR on a predefined mutually agreed currency conversion base.
Consolidated reporting across company codes. Eliminates internal profits to ensures that the group’s consolidated financials reflect only external profits
Picture: Group Valuation in a Transaction
4.3) Business Scenario 3 – Profit Center Valuation
This scenario involves profit centre accountings in the respective company. Company A sells to company B at a negotiated selling price of 110 Singapore Dollar with Company A cost of 100 Singapore Dollar. It means Company A Manufacturing Profit Centre books profit of 10 Singapore Dollar.
Similarly, Company “B” Sales profit center books profit of Sales Price (in US DOLLAR) to customer minus US DOLLAR equivalent of 110 SINGAPORE DOLLAR.
Internal transfer pricing and profitability analysis between business units.
Material Ledger makes it possible with simultaneously posting of all the transactions into different currencies relevant for each valuation.
Now that you have a solid understanding of SAP S/4HANA Material Ledger—its key features, benefits, and practical business scenarios—it’s time to move forward with activation. In the next post, we will guide you through the minimal configuration required to enable Material Ledger in your S/4HANA system. Refer to the post below for a clear, step-by-step activation process in just five easy stages, along with common errors and their root causes to help you avoid potential pitfalls.
Efficient stock movement is critical for seamless supply chain operations, and Stock Transport Orders (STO) in SAP play a key role in ensuring smooth intercompany and plant-to-plant transfers. This makes Mastering Stock Transport Orders (STO) in SAP along with it’s Process, Configuration & Best Practices are even more desired.
Whether we are managing internal stock transfers, intercompany logistics, or cross-plant replenishment, a well-configured STO process can reduce costs, improve inventory visibility, and streamline procurement workflows.
In this post, we will explore mastering end-to-end Stock Transport Orders (STO) in SAP S/4HANA and SAP ECC., it’s Process, key Configuration steps & Best Practices.
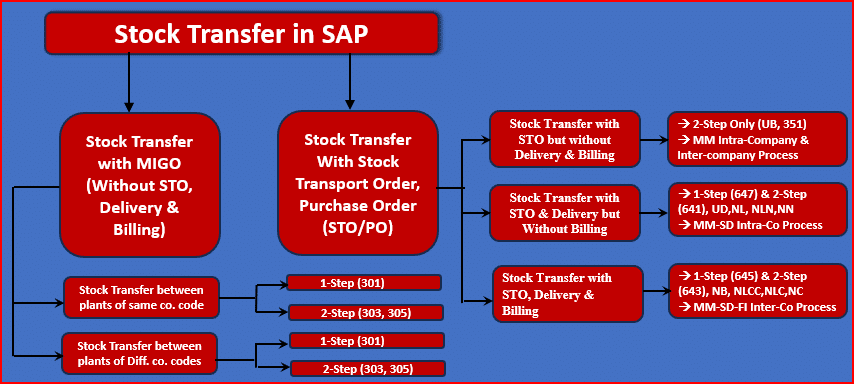
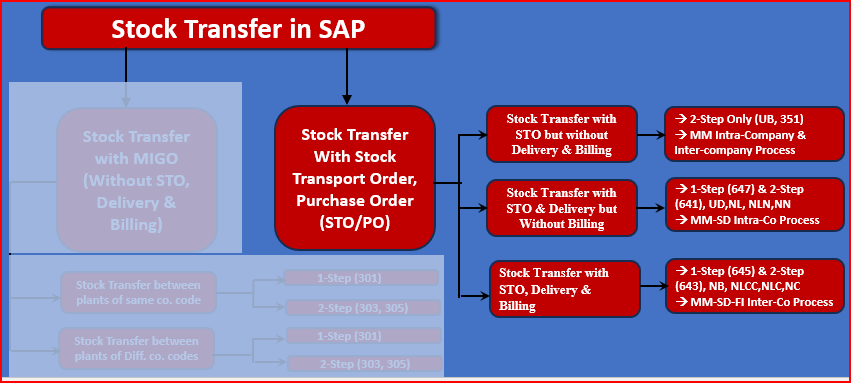
1. Stock Transfer in SAP
As we have already described in the below post there are two types of stock transfer in SAP.
Stock Transfer with MIGO (Without STO, Delivery & Billing)
Stock Transfer With Stock Transport Order, Purchase Order (STO/PO)
Picture: Stock Transfer in SAP
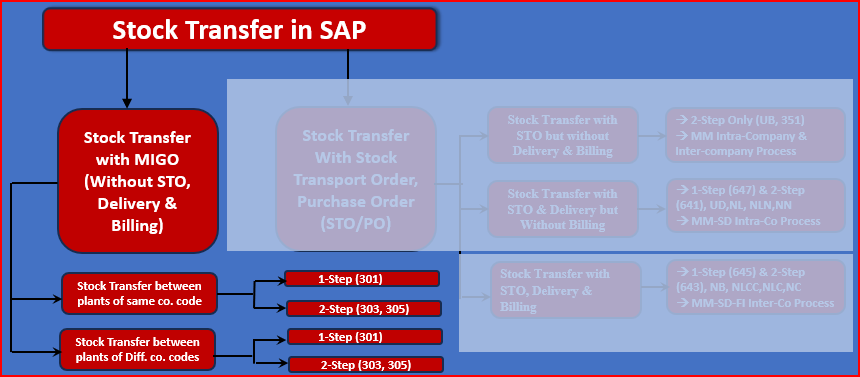
Please see the below post to check the “Stock Transfer with MIGO (Without STO, Delivery & Billing)”
Here in the post , we will see the below part in detail
Picture: Stock Transfer With Stock Transport Order, Purchase Order (STO/PO)
2. Stock Transfer With Stock Transport Order/Purchase Order (STO/PO)
Stock Transport Orders (STO) in SAP play a crucial role in inventory management, procurement, and intercompany logistics. Whether you’re transferring stock between plants, company codes, or warehouses, understanding the different types of STO orders is essential for optimizing supply chain efficiency and cost control.
There are total 3 types of the Stock Transfer With Stock Transport Order, Purchase Order (STO/PO)
Stock Transfer with STO but without Delivery & Billing
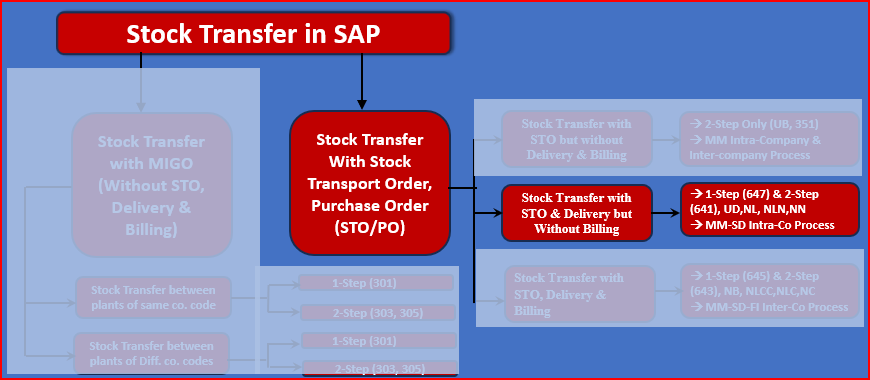
Stock Transfer with STO & Delivery but Without Billing
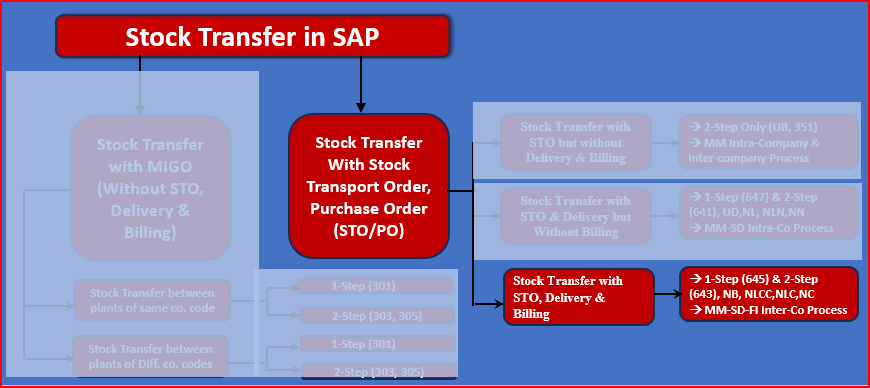
Stock Transfer with STO, Delivery & Billing
Picture: Types of Stock Transfer With Stock Transport Order, Purchase Order (STO/PO)
We will look into all the three method of stock transfer with STO/PO one by one in detail
2.1 Stock Transfer with STO but without Delivery & Billing
This type of STO is used when transferring stock between two plants within the same company code. It ensures better inventory tracking and valuation compared to a standard transfer posting.
Below is the pictorial representation of this type of STO
Picture: Stock Transfer with STO but without Delivery & Billing
2.1.1 Key Features
To simplify the process for internal stock transfers, businesses may choose to use STO without delivery and billing,
–> STO is a specialized purchase order used for stock movement between two plants, allowing the receiving plant to place an order for stock from the supplying plant.
–> STO enables smooth inventory management and tracks the movement of stock.
–> STO without delivery is used when there is no need to track the logistical steps involved in physically shipping the goods.
–> STO without delivery reduces the administrative workload associated with generating and managing delivery documentation.
–> Stock’s value between the plants is accounted via internal material valuation rather than through external invoicing or billing.
–> Uses a purchase order (PO) document type UB.
--> Stock Transfer with STO but without Delivery & Billing can not be executed in 1-step i.e.2-steps only.

--> If any of the supplier plant or customer plant belongs to the different company code then STO process becomes intercompany STO process.

--> If supplier plant & customer plant belongs to the same company code then STO process becomes intra-company STO process.

--> This process uses movement type 351
2.1.2 Advantage of Using STO Without Delivery & Billing
A manufacturing company transfers raw materials from Plant A (Production Plant) to Plant B (Distribution Center) under the same company code.
Below are the main Advantage of Using STO Without Delivery & Billing
Efficiency in Stock Movements: By skipping the delivery and billing steps, stock transfers are more quickly, especially for frequent internal movements.
Simplified Documentation: Reducing extensive documentation such as billing and delivery notes helps in streamlining internal operations and save time.
Cost Reduction: Delivery and billing elimination in intra-company transfers reduces administrative and logistical costs.
Ideal for Intra-company Movements: STO Without Delivery & Billing is best suited for the organizations that frequently move stock between plants without needing to generate financial documents between company codes.
2.1.3 Business Scenarios of STO without Delivery & Billing
Below are the main business Scenarios of the STO without Delivery & Billing
Plant-to-Plant Transfers: Stock movement for production needs or inventory balancing can be done using STO without delivery or billing.
Distribution Center Replenishment: Companies with multiple storage locations can use Stock Transfer with STO but without Delivery & Billing to replenish stock without the need for complex documentation
2.1.4 Configuration & Testing of STO without Delivery & Billing
Please see the below post for the details of configuration & testing of STO without Delivery & Billing
2.2 Stock Transport Order with Delivery (STO with SD Delivery Process)
This STO type is used when stock transfers require a delivery document generated via SAP SD (Sales & Distribution Module). This is common when warehouse teams handle goods movement through outbound deliveries.
This setup is particularly useful for intra-company transfers where financial transactions are not required
Please see the below picture to see the pictorial representation of this stock transfer method
Picture: Stock Transport Order with Delivery (STO with SD Delivery Process)
2.2.1 Key Features of Stock Transport Order with Delivery but Without Billing
STO with delivery uses delivery document to track the logistics of stock movement.
The delivery is essential to monitor goods physically leaving one plant and being received by another.
Since this process is usually used in intra-company STO process, billing is not required to allow for smoother internal movements of stock without generating invoices or financial documents.
In the case of “Stock Transfer with STO & Delivery but Without Billing”, the cost and inventory valuation are adjusted internally, without the need for billing documentation.
“Stock Transfer with STO & Delivery but Without Billing” can include shipping cost determination
2.2.2 Business Scenario for Stock Transport Order with Delivery but Without Billing
Below are the main Business Scenarios for Stock Transport Order with Delivery but Without Billing
Internal Plant-to-Plant Transfers: The scenario of regularly move stock between plants within the same company code like Distribution Center, production center etc. , STO with delivery but no billing simplifies this move.
Replenishing Inventory Between Storage Locations: Stock movements is easily managed without billing complexity with delivery tracking for the distribution centers or warehouses under the same legal entity.
2.2.3 Advantage of Stock Transport Order with Delivery but Without Billing
Below are the main advantage of using STO & Delivery Without Billing
Efficiency in Intra-company Stock Movements: Stock Transfer using STO & Delivery Without Billing Eliminates the billing step which reduces complexity and speeds up the stock transfer.
Simplified Documentation: In this process business can focus on tracking deliveries and managing inventory as there is no need to generate financial documents.
Cost Control: Elimination of billing process saves administrative and financial costs.
Enhanced Inventory Tracking: This process uses delivery. Delivery documents allows to maintain a clear record of stock movements without the need for complex financial reconciliation.
2.2.4 Configuration & Testing of STO with Delivery but Without Billing
Please see the below post for the details of configuration & testing of STO without Delivery & Billing
Intercompany STO is used when transferring stock between plants in different company codes. It requires a more complex process as it involves intercompany billing and affects financial accounting entries.
Please see below the pictorial representation of this method of stock transfer
Picture: Inter-Company STO with Delivery & Billing
2.3.1 Key Features
Uses a purchase order (PO) document type NB
Requires billing document
Includes intercompany invoice posting
Can involve profit center accounting
2.3.2 Business Scenario
A company transfers finished goods from Plant X (Company Code 1000) to Plant Y (Company Code 2000), where Company Code 1000 issues an invoice to Company Code 2000 for the stock transfer.
2.3.3 Configuration & testing of Intercompany Stock Transport Order (Inter-Company STO)
Please see the below post for the details of configuration & testing of SAP Intercompany STO Process with Delivery & Billing
Stock transfer in SAP play a crucial role in effective inventory management by enabling the seamless movement of goods between storage locations, plants, or even company codes.
Whether we are transferring stock within the same plant, across different plants, or between different organizational units, SAP stock transfer solutions like 1-step and 2-step transfers, offers flexible and robust solutions to manage these transactions efficiently.
1. Stock Transfer in SAP: All Scenarios at a Glance
SAP provides multiple stock transfer methods, including one-step and two-step transfers, stock transport orders (STO), and intercompany transfers, each catering to specific business needs.
Understanding these processes helps businesses optimize supply chain operations, reduce costs, and ensure compliance.
Stock transfer in SAP can be classified into two types from a broader prospective. These can be further divided into several other types.
Please see below this in pictorial form
Picture: Stock Transfer in SAP: All Scenarios at a Glance
1.1 Stock Transfer with MIGO (Without STO, Delivery & Billing)
This is the simplest form of stock transfer in SAP.
In this scenario, no stock transfer order or purchase order is created.
Stock transfer is directly initiated in MIGO without any predecessor document like STO or PO.
This stock transfer process can be further bifurcated into two
Stock Transfer between plants of same company code
Stock Transfer between plants of Different company codes
Both the above two types can be executed in 1-step or 2-step process.
We will look into these in detail in the later section
Please see below these types of stock transfer in pictorial form.
Picture: Stock Transfer with MIGO (Without STO, Delivery & Billing)
These types of stock transfers offer a more simplified method, primarily suited for intra-company movements or specific organizational needs
--> This stock transfer method optimize the logistics processes and eliminate some administrative overheads.

--> This method of stock transfer refers to directly moving materials between storage locations or plants without creating a purchase order or transport order.

--> This is often beneficial in cases of internal transfers where financial and logistical documentation requirements are minimal.
1.1.1 Advantages of Stock Transfer with MIGO
Below are the advantages of Stock Transfer with MIGO i.e. without STO, Delivery & Billing
a) Cost Efficiency:
Stock Transfer without STO, Delivery & Billing eliminates administrative costs associated with creating and managing transport orders and deliveries.
b) Speed
Stock Transfer without STO, Delivery & Billing accelerates the stock movement process by avoiding complex & long order creation steps.
c) Simplified Process
Stock Transfer without STO, Delivery & Billing is Ideal for companies with frequent internal stock movement. It reduces paperwork and processing time.
1.1.2 Business Scenarios of Stock Transfer with MIGO
Below are the possible business scenarios of Stock Transfer with MIGO i.e. without STO, Delivery & Billing
a) Internal Stock Rebalancing
Stock Transfer without STO, Delivery & Billing comes handy, When warehouses or plants need to balance inventory across locations.
b) Emergency Stock Transfer
Stock Transfer without STO, Delivery & Billing caters well where Immediate stock movement required for production needs without the need for extensive documentation.
c) Supply Chain Improvement
Since this process optimize stock transfers without using stock transport orders, businesses can streamline operations, reduce overhead costs, and improve supply chain responsiveness.
Before looking into execution of stock transfer we will check what is inter-company stock transfer & intra-company Stock Transfer
1.1.3 Inter-Company & Intra-Company Stock Transfer
A large company having plants in different locations needs to move the material between it’s plants. For example We have two plants on our car business PA10 & PA20.
Plant PA10 produces engines and plant PA20 assembles the car using the engines produced in plant PA10. So to transfer the engines from the plant PA10 to PA20 we will use STO (Stock Transport Order) in SAP
--> Now in the above example if plants PA10 & PA20 belongs to same company code (No need of having separate legal accounts etc.) then it will be an example of intracompany STO.

--> If Plant PA10 & PA20 belongs to different company code (to have separate legal accounts etc.) then it will be an example of intercompany STO.
For our car business we have two companies and three plants as shown in the below picture
Picture : Our Car Business STO Scenarios
The STO between plants PA10 & PA20 (Both belongs to Company Code PA10) will be a intra-company STO).
The STO between plants PA10/PA20 (Both belongs to Company Code PA10) & PP10 (Belongs to company code PP10) will be a intercompany STO).
1.1.4 Execution of Stock Transfer with MIGO
There are further 4 scenarios related to the Stock Transfer without STO, Delivery & Billing
One Step Stock Transfer Between Plants of same Company Code
Two Step Stock Transfer Between Plants of same Company Code
One Step Stock Transfer Between Plants of different Company Code
Two Step Stock Transfer Between Plants of Different Company Codes
a) One Step Stock Transfer Between Plants of same Company Code
In One Step Stock Transfer Between Plants stock is issued from the issuing plant & received in receiving plant in 1 step.
This process uses movement type 301
Start MIGO and choose transaction as “A08 – Transfer Posting” & movement type as “301”
input source plant as “PA10” & destination plant as “PA20”. Both these plants belongs to the same company code.
Picture: One Step Stock Transfer Between Plants of same Company Code
Check & post. Material document & FI documents are posted.
Note: Please check the below posts to see the configuration of organization structure i.e. company codes, plants etc.
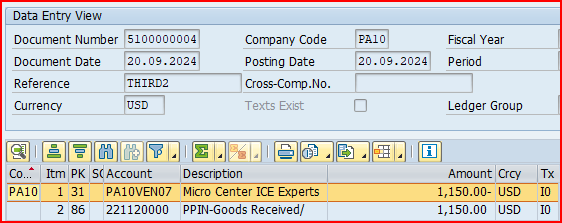
Transaction is posted successfully. Material document & FI document is created
FI document posted in the sending company code
Picture: FI document posted in the sending company code
FI document posted in the Receiving company code
Picture: FI document posted in the Receiving company code
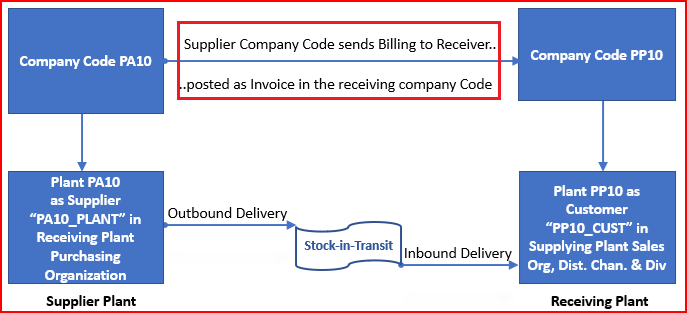
d) Two Step Stock Transfer Between Plants of Different Company Codes
In two Step Stock Transfer Between Plants of different company codes, stock is issued from the issuing plant & received in receiving plant in two step.
As the name suggests , this stock transfer is executed in the two steps.
First step removes the stock from the sending plant from the first company code and post the material into transit.
The second steps place the stock in the receiving plant stock of another company code.
We will see the details of both these steps.
d1) First Step- Removal of the Stock from the Sending plant
This process uses movement type 303 (Transfer posting plant to plant – remove from storage).
Start MIGO and choose transaction as “A08 – Transfer Posting” & movement type as “303”
Picture: First Step- Removal of the Stock from the Sending plant From Different Company Code
check and post. Material document number 4900000218 is posted.
--> Accounting entries for the two step stock transfer will be exactly same as one step stock transfer.
d2) Second Step- Receipt of the stock into the Receiving Plant
This process uses movement type 305 (Transfer posting plant to plant – place in storage).
Start MIGO and choose transaction as “A10 – Place in Storage” against the material document generated in the first step.
Picture: Second Step- Receipt of the stock into the Receiving Plant of Different Company Code
--> No accounting document is posted in the second Step of the receipt of the stock into the Receiving Plant,
1.2 Stock Transfer With Stock Transport Order/Purchase Order (STO/PO)
Here stock transfer process starts with a document i.e. stock transport order, which is a kind of purchase order.
There are several types of Stock Transfer With Stock Transport Order/Purchase Order (STO/PO)
All types of Stock Transfer With Stock Transport Order/Purchase Order (STO/PO) is given below in pictorial form
Picture: Stock Transfer With Stock Transport Order/Purchase Order (STO/PO)
Please continue with the below post for all the step by step details of Stock Transfer With Stock Transport Order/Purchase Order (STO/PO).
Here in this post we will configure SAP consignment & explain the consignment process in detail.
1. What is Consignment
Consignment is a business arrangement where vendor left the goods in the possession of an authorized third party to sell.
Consignment involves a consignor, who is the owner of the goods and provides items to a third party (who is called consignee) to sell on their behalf.
The consignor retains ownership of the goods until they are sold
2. SAP Consignment Process
If we transform the consignment process from the business language to the SAP language, below will be the salient point of the SAP consignment process
In the SAP Consignment process, suppliers delivers the goods at the buyer location, but retains ownership until goods are consumed.
Since ownership is retained by the suppliers at the time of goods delivery, so no financial obligation of the buyer for the goods supply into their premises by seller.
Buyers take the ownership of the goods when goods is removed for consumption.
Since in the vendor consignment process we (our car company) is buyer so if we want to withdraw the vendor consignment stock, there are subsequent two processess
Transfer the goods from the consignment stock to our own stock through MIGO/411K. This is the step when ownership of the goods is transferred and we are financially liable to pay the supplier for the goods.
Now the goods are issued further to process , for example- issue to cost center (201) or issue to production order (261) etc.
3. Configuration of Consignment Process
We will configure the consignment process in SAP. Lets first see what are the steps involved in the configuration of SAP consignment process.
How to configure SAP Consignment Process in 5 Steps
Step 1: Create Consignment Info records
Info Category is “Consignment” & Tax code is mandatory
Step 2: Create Consignment Purchase Order
With Item Category “K”
Step 3: Goods Receipt of the PO
GR will be posted to Non-Valuated Vendor consignment stock owned by Supplier
Step 4: Transfer Posting from Consignment Stock to Own Stock
Financial Posting based on the price given in the info-record
Step 5: Financial settlement of the withdrawn parts
Special Process “Evaluated Receipt Settlement” will be followed
3.1 Consignment Info record Creation
Since stock is owned by supplier so there is no connection between consignment stock and the purchase order
Hence the info record is the only master data from where process get the valuation
Start T-Code ME11
Input Supplier, Material, Purchasing Organization & Plant. Select the category as “Consignment”
Picture: Consignment Info-Record Creation
Input the tax code & Price negotiated with supplier.
Save & purchasing info record is created.
3.2 Consignment Purchase Order Creation
Now we will create Consignment Purchase Order.
To create Consignment PO, have to use item category as “K”
--> Item category defines how the procurement of a material or service item is controlled.

--> The item category determines whether below are mandatory or admissible for an item:
      • Material number
      • Additional account assignment
      • Inventory management in the SAP system
      • Goods receipt
      • Invoice receipt
Let’s see the characteristics of Item Category “K”
GR done and as described above , no financial postings are done at GR
Picture: Consignment PO GR
3.4 Consignment Stock
As described after GR, Non-Valuated Vendor consignment stock owned by Supplier is generated.
Check the stock in MMBE
Picture: Vendor Consignment Stock
3.5 Stock Transfer to Own
Now to use the stock we need to first transfer the stock to our own stock through 411K.
Once we execute this , The Ultimate Guide to Master SAP MM-FI Integration
--> We can directly issue the stock production order or cost center, if we know the details and ready to use the stock. Thus we can eliminate the step of transferring the stock from consignment stock to own stock
SAP MM deals with the procurement of material & services.
Mastering MM-FI integration is crucial in SAP financial control. Mastering MM-FI integration helps to ensure that financial statements accurately reflect the true cost of materials and inventory.
With this Ultimate Guide to Master SAP MM-FI Integration, we will help businesses to make informed decisions about procurement, production, and overall financial health.
Note: This post is solely for automatic determination of GL in MM (OBYC). To check the configuration of SAP MM-FI integration other than the OBYC, please see the below post
--> When we procure material or services, we need to pay to the supplier of material or services.

--> to pay to supplier correctly & timely it is very crucial to record the amount to be paid correctly & on time.

--> In simple terms, MM-FI Integration orchestrates the posting of values in tandem with different quantity movements.
SAP MM FI integration does this crucial work of keeping the correct & on time record of amount to be paid to the suppliers.
1. How MM-FI Integration Works
MM FI integration keeps records of values on the GL (General Ledgers)
Before we go into the detail , we need to first examine what are the expectations from the SAP MM FI integration in order to pay suppliers correctly & on-time.
1.1 Expectations & Solutions from MM-FI integration
Below are the typical characteristics of the business which should be taken care by MM FI integration.
1.1.1 Keep Record as Material Moves
in an organization, material moves due to several reasons. For example-
Receipt of the material from external vendor
Receipt of the material from production
Issue of the material for production
Scrapping of the materials
MM FI integration should capture this movement & record the values on GLs in real time as soon as material moves.
Below are the Elements used by SAP to fulfill this requirements
a) Movement Type
A movement type is a three digit/character identification key for a goods movement. for example – 101 for Goods receipt, 201 for goods issue against cost center , 261 is goods issue against order etc.
b) Value String
Value string is assigned to each relevant movement type in inventory management. Value strings contain keys for relevant posting transaction such as BSX, WRX etc. For Example – movement type 101 contains the value string WE01
c) Transaction/Event keys
Transaction event key is to determine different GL for different business transactions. For example- BSX is used fort stock posting & BSV for change in stock value.
1.1.2 Keep Record for Materials having Different business Characteristics
Organizations has different type of materials like -Raw materials which are used as input for production process.
Semifinished materials might be produced in a production process which can be further consumed to produce final finishes product
MM FI integration should record the values on GLs according to the characteristics of the materials. For example – values for the Raw materials should be captured on the different GL account compare to the semi finished materials for the goods receipt against production order.
or value of the scrapping of the raw material should be captured on different GL account compare to the scrapping of the finished material.
Below are the Elements used by SAP to fulfill this requirements
a) Valuation Class
Valuation class if like further extension of material types.
For example – Material Type – RAW can have two valuation classes as 3100 – Raw material Domestic & 3110 Raw material Imported.
b) Account Modifier / Account Grouping Code
Account Modifier or Account Grouping Code is a three-character code used to differentiate the offsetting accounts
For example- Event is goods issue . But this goods issue can be for goods issue to a production order or for a scrapping etc.
So Account modifier or account grouping code is used for different scenarios like goods issue, scrapping, physical inventory to assign different accounts (for example, consumption account, scrapping etc.)
Another example
Business wants to post price differences to difference accounts in case of goods receipts for purchase orders compare to goods receipts for production orders.
--> Account grouping is used only for offsetting entries, consignment liabilities, and price differences.
The two main organization structure elements in FI & MM are Company code & Plant.
Below elements are used by FI MM integration to post correct values here.
a) Valuation Area
Materials are valuated at plant level or at company code level.
If valuation is at plant level, then valuation area is plant.
If valuation is at company code level, then valuation area is company code.
Hint : Generally Valuation area should be plant otherwise it will be difficult to control the costing of the product.
b) Valuation Area Grouping
Valuation grouping code is used to determine the GL code for more than one valuation areas similar or different.
Our Car business has three plants -PA10, PA20 & PP10 (Valuation Area is plant).
Though PA10 & PA20 plants belongs to different company code compare to PP10, but they use the same chart of account.
We want to post transactions for these plants to the same accounts so we will group these three valuation areas under a single valuation grouping code.
We will group together all our three valuation areas. We will group our valuation areas (plants) PA10, PA20 & PP10 to 0001
This will avoid to configure account determination separately for all plants as shown below
Below is the path to group the valuation areas
SPRO –> IMG –> Materials Management –> Valuation and Account Assignment –> Account Determination –> Account Determination Without Wizard –> Group Together Valuation Areas
3. MM FI Integration Configuration for Different Business Scenarios
Now we will configure FI-MM integration (Automatic account determination) for different business scenarios
3.1 Scenario 1 :Goods Receipt Against Standard Purchase Order
Below are the values of the five elements to configure the FI MM Integration (automatic account determination) for the different events which happens as a result of Goods receipt against purchase order.
3.1.1 Increase in Inventory Value
The first event is – inventory value is increased by the value of the goods purchased. Increase in Inventory Value is posted on the GL accounts through Key BSX. This increase is value is captured & post as shown below.
a) For Raw Material (ROH)
Since the inventory value is increasing so it will be a debit (Dr) transaction
Transaction Key – “BSX”
Valuation Class – “3000”
Account Modifier/Grouping Code – Not Applicable
Valuation Grouping Code – “PPIN”
Posting on General Ledger – “113100000” (PPIN-Inventory – Raw Material). Click HERE for detail.
b) For Trading Material (HAWA)
Since the inventory value is increasing so it will be a debit (Dr) transaction
Transaction Key – “BSX”
Valuation Class – “3100”
Account Modifier/Grouping Code – Not Applicable
Valuation Grouping Code – “PPIN”
Posting on General Ledger – “113600000” (PPIN-Inventory – Trading Goods). Click HEREfor detail.
c) For Semi-Finished Material (HALB)
Since the inventory value is increasing so it will be a debit (Dr) transaction
Transaction Key – “BSX”
Valuation Class – “7900”
Account Modifier/Grouping Code – Not Applicable
Valuation Grouping Code – “PPIN”
Posting on General Ledger – “113300000” (PPIN-Inventory – Semi-Finished Goods). Click HERE for detail.
d) For Finished Material (FERT)
Since the inventory value is increasing so it will be a debit (Dr) transaction
Transaction Key – “BSX”
Valuation Class – “7920”
Account Modifier/Grouping Code – Not Applicable
Valuation Grouping Code – “PPIN”
Posting on General Ledger – “113400000” (PPIN-Inventory – Finished Goods). Click HERE for detail.
e) FI MM Integration Configuration for Increase in Inventory Value
Start OBYC and select Transaction as “BSX”.
Input Chart of Account as “PPIN”
Now configure as per the values given above
Picture : FI MM Integration Configuration for BSX
Since Valuation Modifier 0001 is a grouping of our all three plants (Valuation area PA10, PA20 & PP10) so this configuration is completed for all the three plants.
Note
Please click HEREto check the creation of GL account 113600000
For materials with price control indicator as ‘V’, while posting invoices, the difference will go to Price Difference A/c if the stock is not there.
For materials with price control indicator ‘S’, while making GR (either against Purchase Order or otherwise), the difference between the PO price and the standard price will go to Price Difference.
Production Order variances also gets posted to Price Difference A/c, with offset to COGM A/c.
--> We have created two Price variance (Difference) accounts
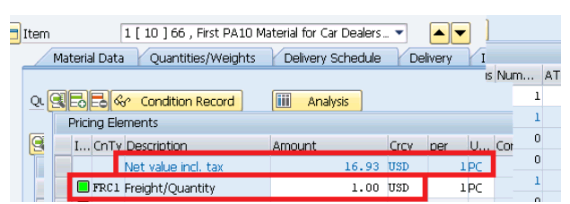
If we use delivery cost in the PO price schema then we need to post the fright charges to the relevant GL accounts.
System will search the GL account corresponding to the posting key which is used against freight condition type.
Here system is searching GL account for Key FR1 because in our pricing schema we have used key FR1 for condition “FRC1”. And in PO we have used condition “FRC1″for freight charges. Please check in detail HERE
Please check the pricing schema from the link to the post given below
Below are the values of the five elements to configure the FI MM Integration (automatic account determination) for initial stock load.
3.2.1 Increase in Inventory Value
Due to stock load inventory value will be increased. This increase is value is captured through transaction key “BSX” & post same as shown above in goods receipt against purchase order.
3.2.2 Offsetting entry to increase in Inventory Value
GBB is the accounting key for “Offsetting entry for inventory posting”. Further as explained previously account modifiers are used to tell the system against which account the offsetting entry to inventory should be accounted. Some example are -VAX: for goods issues for sales orders, VBR: for internal goods issues (for example, for cost center), VNG: for scrapping/destruction etc.
a) For Raw Material (ROH)
Transaction Key – “GBB”
Valuation Class – “3000”
Account Modifier/Grouping Code – “BSA”
Valuation Grouping Code – “PPIN”
Posting on General Ledger – “339911000” (PPIN-Inventory – Initial Entry of Raw Material Balances). Click HERE for detail
b) For Trading goods (HAWA)
Transaction Key – “GBB”
Valuation Class – “3100”
Account Modifier/Grouping Code – “BSA”
Valuation Grouping Code – “PPIN”
Posting on General Ledger – “339912000” (PPIN-Inventory – Initial Entry SF & Finish Goods Balances). Click HEREfor detail
c) For Raw Material (HALB)
Transaction Key – “GBB”
Valuation Class – “7900”
Account Modifier/Grouping Code – “BSA”
Valuation Grouping Code – “PPIN”
Posting on General Ledger – “339912000” (PPIN-Inventory – Initial Entry SF & Finish Goods Balances). Click HERE for detail
d) For Finished Material (FERT)
Transaction Key – “GBB”
Valuation Class – “7920”
Account Modifier/Grouping Code – “BSA”
Valuation Grouping Code – “PPIN”
Posting on General Ledger – “339912000” (PPIN-Inventory – Initial Entry SF & Finish Goods Balances). Click HERE for detail
e) FI MM Integration Configuration for Initial Stock Load
When goods are issues against sales order, inventory is decreased and offsetting entry is posted against COGS (Cost of goods sold)
3.3.1 Decrease in Inventory
Due to goods issue, inventory value will be decreased. This is captured through transaction key “BSX” & post same as shown above in goods receipt against purchase order. The only difference is now it is credit (-ve) against earlier debit (+ve) in goods receipt.
3.3.2 Offsetting entry to decrease in Inventory Value
GBB is the accounting key for “Offsetting entry for inventory posting”. Further as explained previously account modifiers are used to tell the system against which account the offsetting entry to inventory should be accounted.
Here account modifier will be VAX: for goods issues for sales orders.
a) For Raw Material (ROH)
Transaction Key – “GBB”
Valuation Class – “3000”
Account Modifier/Grouping Code – “VAX”
Valuation Grouping Code – “PPIN”
Posting on General Ledger – “550100000” (PPIN-Cost of Goods Sold Raw Material). Click HERE for detail
b) For Trading Material (HAWA)
Transaction Key – “GBB”
Valuation Class – “3100”
Account Modifier/Grouping Code – “VAX”
Valuation Grouping Code – “PPIN”
Posting on General Ledger – “550200000” (PPIN-Cost of Goods Sold Trading Material). Click HERE for detail
c) For Semi-Finished Material (HALB)
Transaction Key – “GBB”
Valuation Class – “7900”
Account Modifier/Grouping Code – “VAX”
Valuation Grouping Code – “PPIN”
Posting on General Ledger – “550300000” (PPIN-Cost of Goods Sold Semi-Finished Material). Click HERE for detail
d) For Finished Material (FERT)
Transaction Key – “GBB”
Valuation Class – “7920”
Account Modifier/Grouping Code – “VAX”
Valuation Grouping Code – “PPIN”
Posting on General Ledger – “550300000” (PPIN-Cost of Goods Sold Finished Material). Click HERE for detail
e) FI MM Integration Configuration for Sales Order Goods Issue
3.5 Scenario 5: Subcontracting Purchasing FI Integration
Subcontracting Process is a Special Procurement Process where a company outsources certain Manufacturing Processes to produce Sami fished or finished material to a Subcontracting Vendor.
Please check the below post for detail subcontracting process configuration & Testing
a) GBB+VBO
VBO is used to post GL for consumption of Stock material to vendor (543) – Receiving of material from subcontractor RM consumption
We have configured GL 551900000 (PPIN-Consumption – Subcontracting, w/o CE) for all the material types (Valuation Class 3000 for Raw Materials, 3100 for Trading goods, 7900 for Semifinished Goods & 7920 for Finished Goods
Configure GBB+VBO as per below
Picture: OBYC Configuration for GBB+VBO
b) BSV
This key is used to configure Change in stock account – Subcontracting
We have configured GL 550200000 (PPIN-Cost of Goods Sold (Trade w/o Cost Element)
Picture: OBYC Configuration for BSV
c) FRL
Accounting key FRL is used to post outside Processing Charges – subcontracting charges GL account
We have configured GL 665008500 (PPIN-Subcontracting Services)
A Purchase Order (PO) in SAP MM (Materials Management) is one of the most crucial documents in procurement and supply chain management, ensuring seamless transactions between buyers and vendors.
In today’s fast-paced business environment, optimizing purchase order processing can lead to cost savings, improved vendor relationships, and streamlined supply chain operations.
This guide will cover everything you need to know about SAP MM purchase orders, including PO creation, types, approval workflows, integration with accounts payable (AP), and best practices for automation.
Whether you’re an SAP consultant, procurement manager, or business analyst, understanding purchase orders in SAP MM can help enhance procurement efficiency, reduce maverick spending, and improve inventory management.
Additionally, we’ll explore how automating POs in SAP MM can reduce errors, ensure compliance, and optimize cash flow—key factors that drive enterprise profitability and cost optimization.
1. Why Purchase Orders Matter for Businesses
For companies leveraging SAP ERP, a well-defined purchase order process is essential for:
Reducing procurement costs through better vendor negotiations
Avoiding duplicate purchases and ensuring accurate invoice matching
Ensuring compliance with contract terms and supplier agreements
Enhancing cash flow management through optimized payment terms
With SAP S/4HANA, businesses can further improve their procurement automation, invoice reconciliation, and supplier collaboration—making it easier to manage direct and indirect procurement processes effectively.
Purchase Order is a part of Procure to Pay (P2P) cycle of SAP
Procure to Pay (P2P) cycle starts from Purchase Requisition (PR) and finish with payment to the vendor.Below are the components of P2P Cycle
Purchase Requisition --> Purchase Order --> Good Receipt --> Invoice Receipt --> Vendor Payment
We will start with configuration of Purchase Order in this post.
Also we will have a look on different types of Purchase Orders, their goods receipt as well as respective invoice receipt.
2. What is Purchase Order in SAP
Purchase order in sap is a type of legal contract which binds the supplier to supply the described materials or services & purchaser to pay after receiving the described materials or services.
So purchase order should contain
A Vendor/Supplier.
Purchase Organization structure like -Who is the contact (Purchasing group/Purchasing organization etc).
Material details.
Delivery date.
Quantity
Price
Delivery cost
Taxes.
Delivery address
2.1 Different Purchasing Scenarios in SAP
There are different types of purchase orders in SAP.
Scenario 1: Standard Purchase Order
Scenario 2: Consignment Purchase Order
Scenario 3: Third Party Purchasing
Scenario 4: Stock Transport Order (STO)
Scenario 5: Subcontracting Purchase Order
3. Scenario 1: Standard Purchase Order
Standard purchase orderspecifies the materials being procured, their quantity, agreed price and delivery date.
Standard PO does not has and type of special purchasing like subcontracting or consignment purchasing where purchaser is not charged till they withdraw the materials for actual consumption.
Configuration of standard purchase order
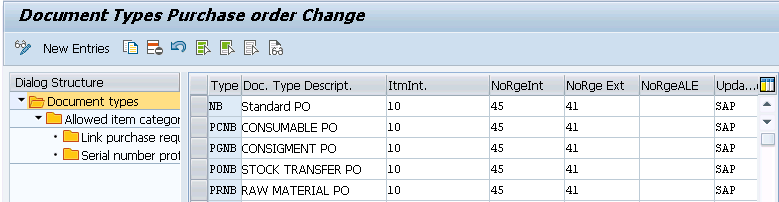
3.1 Define Document Types for Standard Purchase Orders
Purchase Orders are managed as document types in SAP
Document types decides a lot of factors.
For our car business, we will use standard document type “NB” for standard purchase orders
SPRO –> Materials Management –> Purchasing –> Purchase Order –> Define Document Types for Purchase Orders
Picture : NB Document Type
Select “NB” and click on “Allowed Item Categories”
3.2 Item Category
Item category defines how the procurement of a material or service item is controlled.
For example – Item category determines the field selection or determines whether a goods receipt or invoice receipt is to follow.
There are below item categories available
Standard
Consignment
Subcontracting
Third-party
Stock transfer
Service
Material unknown
Material group
Text
Examples
Some Examples of Item category control
--> "Standard" Item Category requires goods receipts and invoice receipts.
--> In "Consignment" item category, invoice receipts are not allowed.
--> For item category "Subcontracting", components to be provided are presented on a screen.
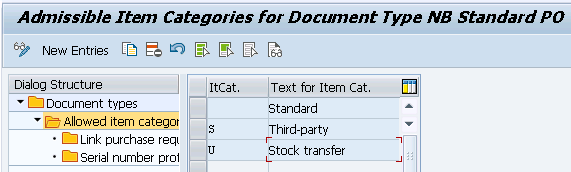
We have selected three item categories which are allowed with our standard purchase order document type “NB”
Picture : Allowed Item Categories
Note : Item Categories can not be configured. These are maintained by SAP, therefore we cannot change them. However, we can change the “External Representation” of PO item categories in IMG.
3.3 Confirmations
Confirmations represents the notification from the vendor to the purchaser regarding the status of a purchase order.
Confirmation covers all types of communications sent by a vendor (external supplier) to the purchaser.
A vendor confirmation
Can be an order acknowledgment,
Can be a loading or transport confirmation
Can be a shipping notification.
Confirmations enable the purchaser to plan more exactly due to receipt of up-to-date information the expected delivery. from the vendor.
3.3.1 Define External Confirmation Categories
Extenal confirmation categories are sent by the vendor through EDI etc.
Example of confirmation categories sent by vendor
AB-Order Acknowledgment
CH-PO change
GW-Rough GR
LA-Inbound Delivery
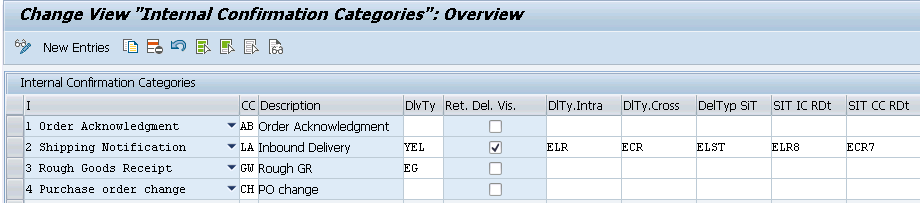
3.3.2 Define Internal Confirmation Categories
In this step, an external confirmation category is assigned to each internal confirmation category.
This assignment is required for system to be able to recognize which confirmation category represents order acknowledgments and which one represents shipping notifications.
Confirmation control in the form of Confirmation control key for PO items can be defined with just one confirmation category (e.g. shipping notification) or a confirmation control key covering several confirmation categories (order acknowledgment, loading confirmation, shipping notification).
SPRO –> Materials Management –> Purchasing –> Purchase Order –> Confirmations –> Set Up Confirmation Control
Picture : Set Up Confirmation Control
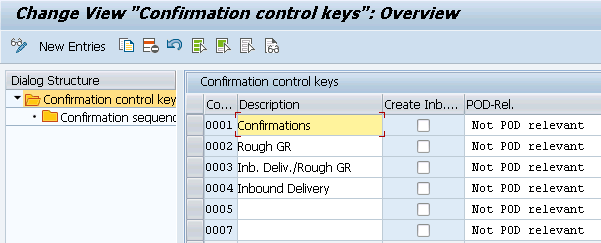
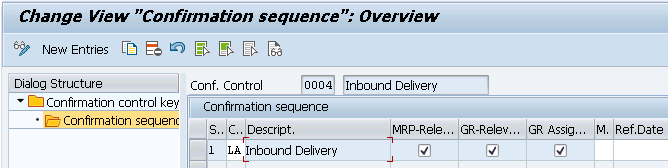
Now select Confirmation control key “0004” and click on confirmation sequence.
Picture : Conf. control key 0004 configuration
So as per above configuration, if we assign confirmation control key "0004" in our PO item, we must create inbound delivery to do the goods receipt instead of MIGO.
3.4 Create Standard Purchase Order
We will create a standard purchase order now
Start ME21N
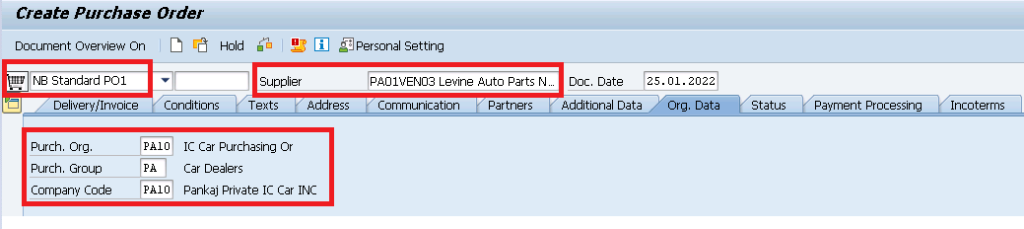
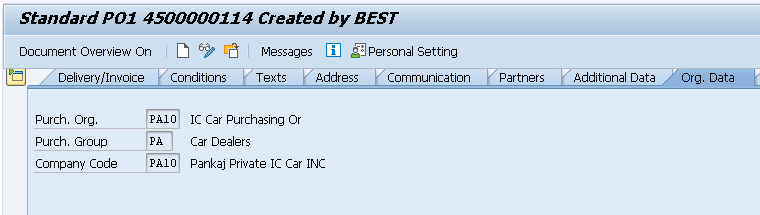
3.4.1 PO Header
First fill the PO header fields as shown in the below screenshot
Purchasing Document Type – NB (Standard)
Vendor-PA01VEN03 (Levine Auto Parts Norwalk).
Purch.Org-PA10
Purchasing Group -PA
Company Code -PA10
Note :
Please click HERE to check the step by step BP vendor creation in detail
Below main fields are available to input in PO line item
Item Category – Blank as we are creating standard PO as described above.
Material -66
Plant -PA10
SLOC-PP1A (Defaulted from Material Master)
PO Quantity – 1 PC
Price – 14 USD/PC (From info record)
Note :
Please click HERE to check the step by step material creation in detail
Picture : PO Line item
3.4.3 PO Line Item Details
There are several tabs giving different details for PO line item.
We can select the line item in drop down for which we are checking the details as shown in the below screenshot
Picture : Selection of PO item in drop-down
Let,s see one by one
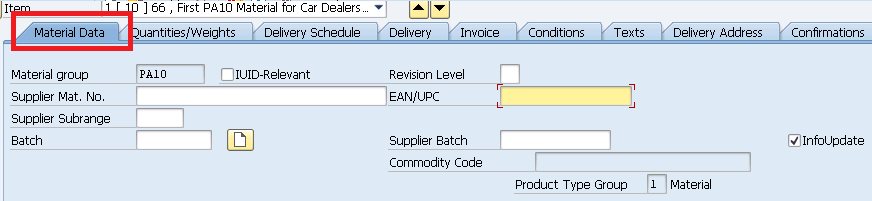
3.4.3.1 “Material Data” Tab
Main information in this tab are batch & “Info-update” indicator
Picture : “Material Data” Tab
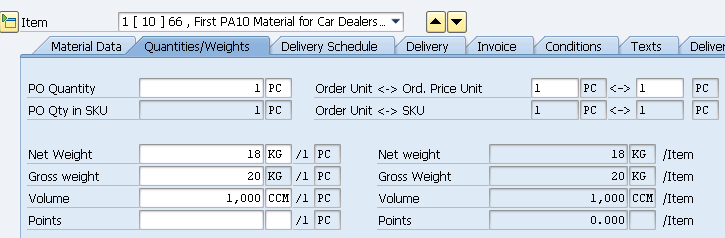
3.4.3.2 “Quantities/Weight” Tab
In this tab material information related to weight and volume flows from the material master records.
Also system multiplies weight & volume from the material master by the PO quantity to show the total PO weight & volume.
Picture : “Quantities/Weight” Tab
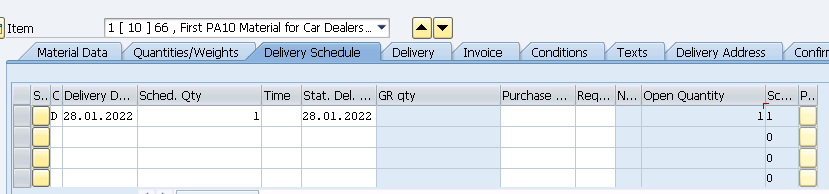
3.4.3.3 “Delivery Schedule” Tab
In this tab , system shows delivery date and related information. for STO this tab shows schedule line type information with committed quantity as per the availability check.
Picture : “Delivery Schedule” Tab
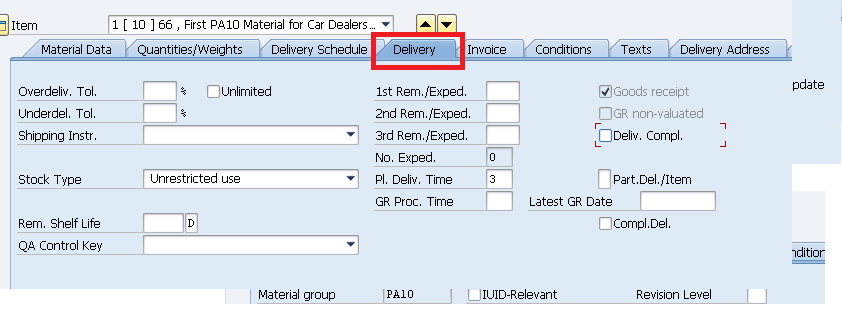
3.4.3.4 “Delivery” Tab
In this tab system shows further information related to delivery like what is the under-delivery or over-delivery tolerance, reminders etc. All these information flows from the purchasing value key.
Picture : “Delivery” Tab
Some very important information is shown in this tab as described below
a) Stoke type
The goods will be receipt in “Unrestricted” or “QI” or “Blocked stock” as per the selection here.
Stock Type can be manually selected or if configured, flows from the QM view of the material master.
b) Goods Receipt Indicator
This indicator specifies if goods receipt is expected.
GR Indicator comes as active by default based on the Item Category and Account Assignment Category.

--> In case of Standard Item Category w/o Account Assignment Category, GR Indicator comes by default

--> In case of Account Assigned POs, default settings depends on the configuration of Account Assignment Category
c) Goods Receipt, Non-Valuated
Specifies that the goods receipt for this item is not to be valuated at GR. If selected then valuation for this item will be done at the time of invoicing.
This flows from account assignment category configuration
d) Delivery Completed” Indicator
if this is selected then it means system is not expecting further delivery for this item i.e this item is closed.
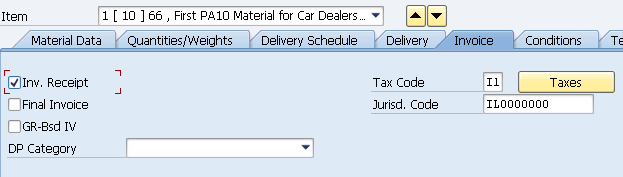
3.4.3.5 “Invoice” Tab
This tab has very important information.
Picture : “Invoice” Tab
a) Invoice receipt indicator
This indicator specifies if an invoice receipt is expected for the purchase order item.
If Invoice receipt indicator is not set, the goods are to be delivered free of chargeThis indicator flows from
--> Define External Representation of Item Categories , under Control invoice receipt section.
--> For account assigned PO it will come from account assignment category.
b) Final Invoice Indicator
Indicates that the last invoice from a supplier has been received for an item with no further invoice is expected.
c) GR-Based Invoice Verification Indicator
This Indicator specifies goods-receipt-based invoice verification for a purchase order item or invoice item.
If this indicator is selected, that means invoice for the order item can be entered with reference to a GR document or a delivery number entered at GR.
Setting of GR-Based Invoice Verification Indicator means a separate invoice item is created for each goods receipt.

That means checking of price and formal accuracy of the invoice is performed at this item level.
d) Tax Code
Here tax code which is unique per country is specified. For each tax code, tax rate is stored and calculation is done.
Note :
Tax code is automatically determined in this PO tab depending upon the configuration done. Similarly system calculate the tax amount too automatically.
Please check the below post for step by step details of MM input tax
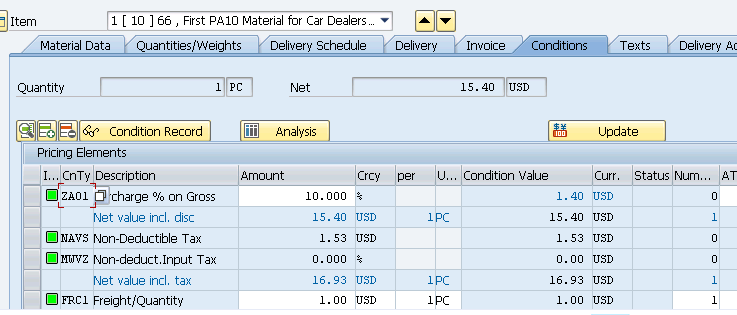
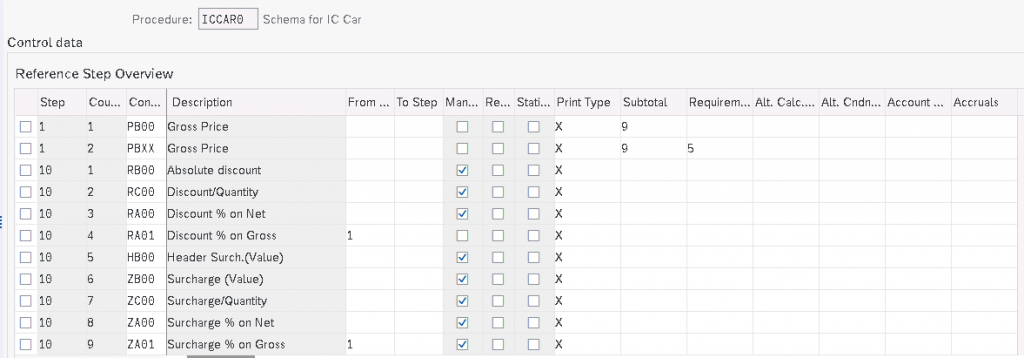
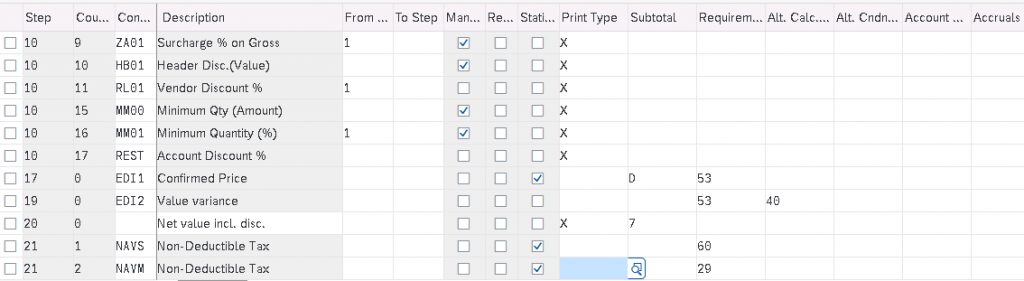
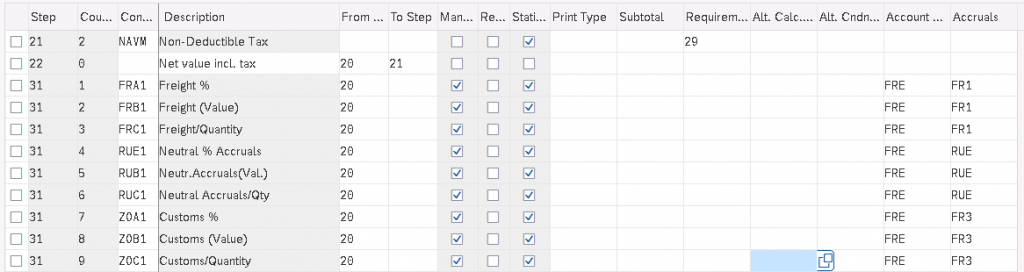
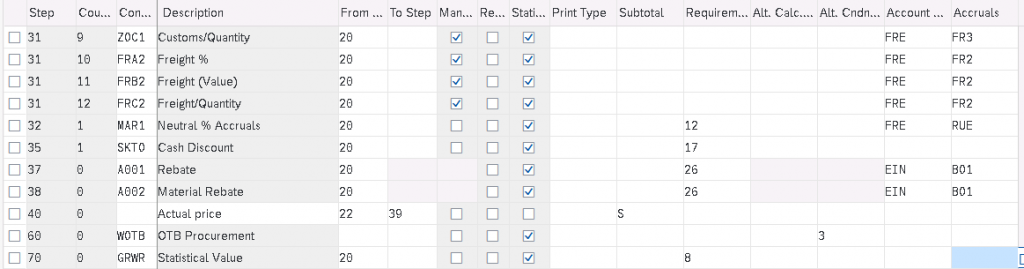
In this tab system calculates landing cost of the material depending upon the base price, discount/surcharges, tax, delivery cost etc.
Picture : “Conditions” Tab
Please click HERE to see PO Price components in details
3.4.3.7 “Delivery Address” Tab
In this tab, delivery address which is generally plant address is copied from the plant configuration and presented.
Picture : “Delivery Address” Tab
Please note highlighted "Supplier" with "SC Supp" fields in the above screenshot, which can eliminate one step from the subcontracting purchasing cycle.

If we select this indicator and input subcontracting supplier , then system directly provide the purchased materials to the subcontractor , which can be seen as special stock "O" in the stock reports of the plant.
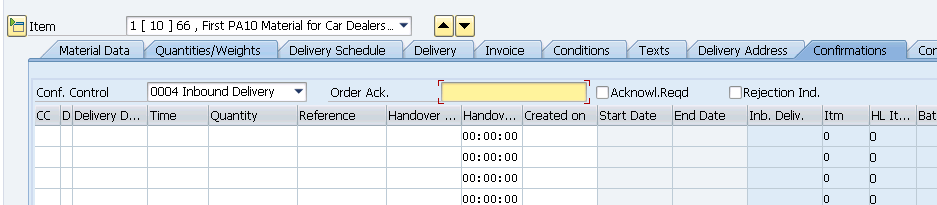
3.4.3.8 “Confirmations” Tab
Here confirmation control in the form of Confirmation control key for PO items is defined with just one confirmation category (e.g. shipping notification) or a confirmation control key covering several confirmation categories (order acknowledgment, loading confirmation, shipping notification).
As configured earlier, we have assigned confirmation control key “0004” in our PO item.
So we have to create inbound delivery to do the goods receipt instead of MIGO.
Picture : “Confirmations” Tab
PO is created now
Picture : PO is created
3.4.3.9 Expected Error in PO Creation & Resolution
Error M8215 -Maintain tolerance limits for tolerance key PE while creating PO. Please click HERE to check how to resolve this error.
Error KI102-Control indicators for controlling area PPIN do not exist. Please click HERE to check how to resolve this error.
3.5 Goods Receipt
Since we have assigned confirmation control key to our PO line item , therefor we can not do the goods receipt by MIGO.
We have to create inbound delivery and do the goods receipt based on the inbound delivery.
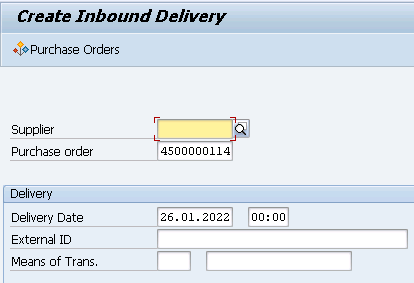
3.5.1 Inbound delivery creation
To create inbound delivery start VL31N
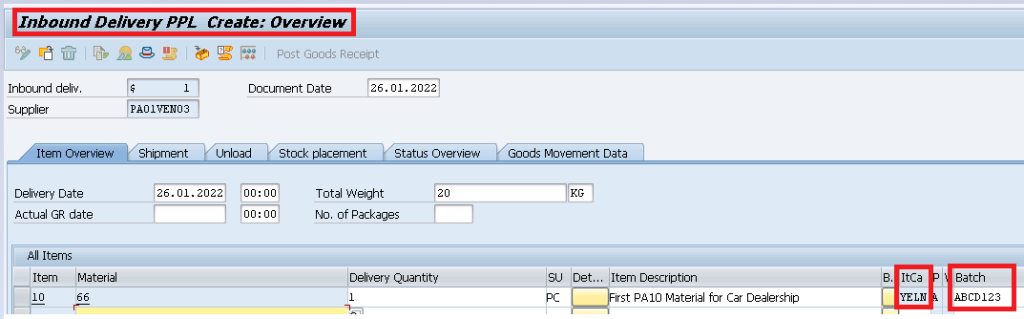
Picture : Starting of IBD creationPicture : IBD Creation Next Screen
Please note Item category is determined as “YELN” in the above inbound delivery.
Input the batch number.
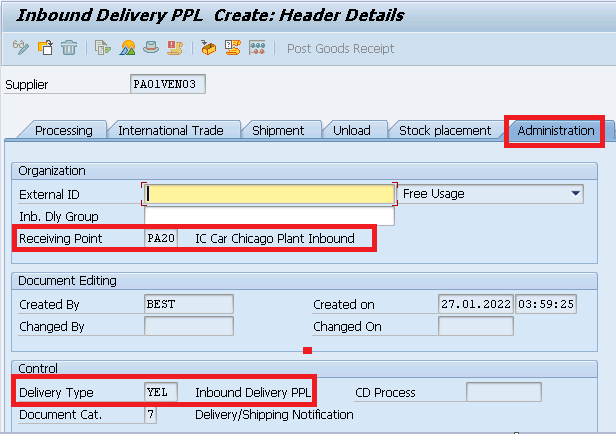
Click on Header details and select “Administration” tab. You will note that delivery type is “YEL” as specified in “Confirmation Control Key”
Picture : Inbound Delivery “YEL” Type
Note
--> Please click HEREto check "Receiving Point" determination configuration in Inbound Delivery
--> Please click HERE to check Item category "YELN" determination in Inbound Delivery
save the inbound delivery
Picture : Inbound Delivery is created
3.5.2 Display Inbound Delivery
you can display inbound delivery through VL33N
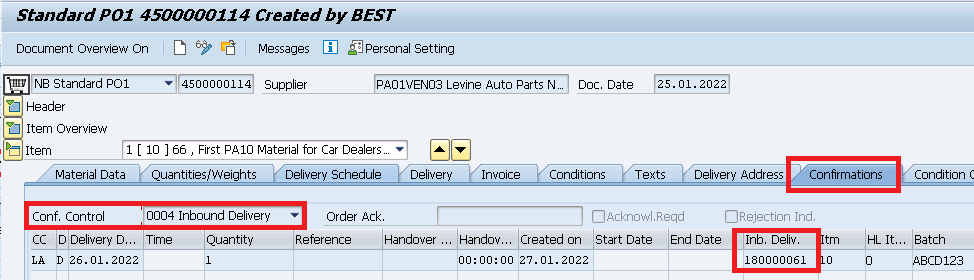
or alternatively Inbound delivery number is updated in the “Confirmation” tab of the PO line item as shown in the below screenshot
Picture : Inbound delivery in Purchase Order
Double click on the inbound delivery and system will take you to display inbound delivery VL33N.
3.5.3 Good Receipt 1st Step -Inbound Delivery Put-away
Inbound delivery based goods receipt is done in two steps. First step is put away of the goods and second step is Goods Receipt.
Start VL32N & input you delivery number . Press enter
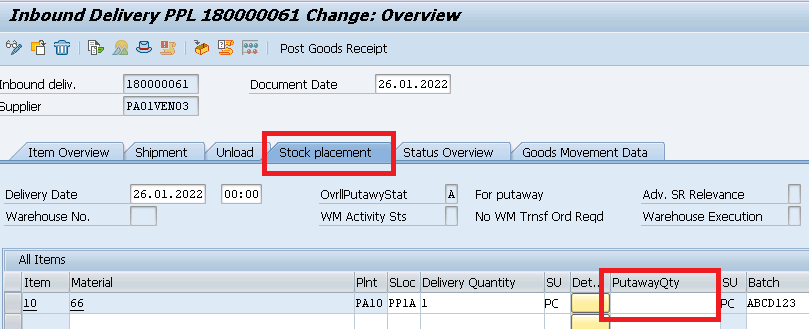
Click on “Stock Placement” tab
Picture : Inbound Delivery put-away
input put-away qty as 1
--> Please note that you need to put-away full delivery quantity in order to be able to do goods receipt.

--> If lesser quantity from delivery quantity is available then change the delivery qty equal to the qty available for put-away.
3.5.4 Good Receipt 2nd Step -Inbound Delivery GR
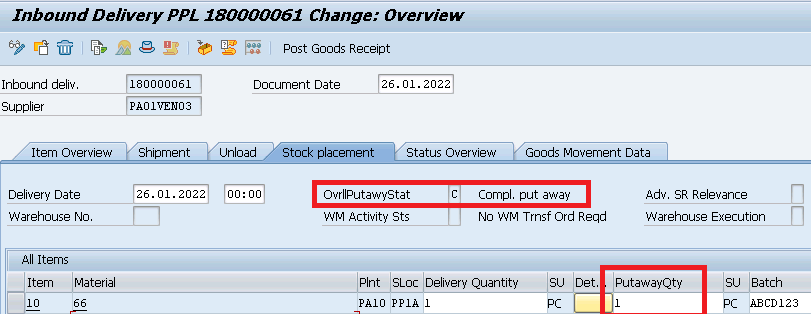
As soon as inbound delivery put-away quantity is entered , put-away status is changed from “A-For put-away” to “C-Compl. put away”
Picture : Put-away Completion
Now press on “Post Goods Receipt”. Goods Receipt is completed
Picture : GR Completion
Document flow as well as PO history is updated.
Note
With the goods receipt completion, Stock is posted in the inventory with automatic FI postings in the background to the relevant accounts. Please see the below post to check in all the consequences of goods receipt in detail.
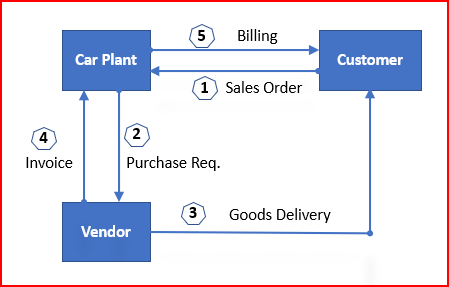
In the third party Order processing , our business outsource the final product to a third party to sell it to customer.
There are two type of third party processess
5.1 Scenario 3.1: Third Party Sales
Upon receiving third party order order from the customer, business passes it to the third party vendor who delivers the goods to the customer, and invoice to our business. Our business bills the customer for the goods supplied.
Picture: SAP Third Party Sales Flow
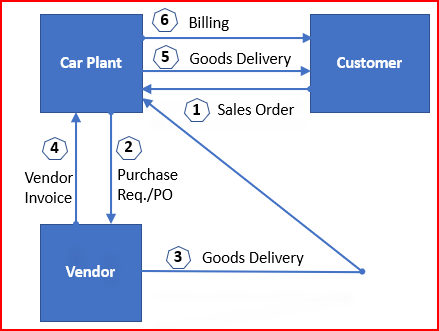
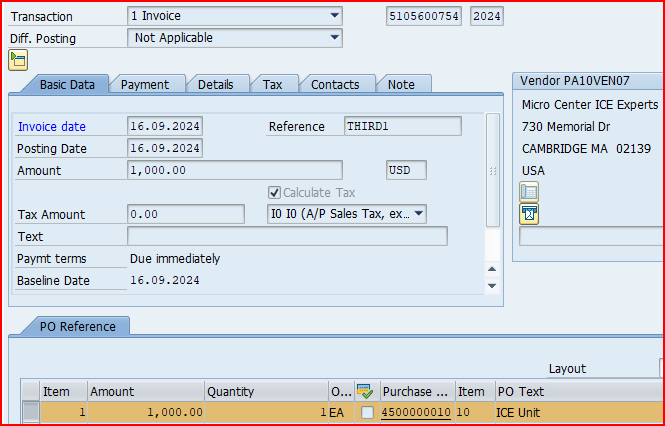
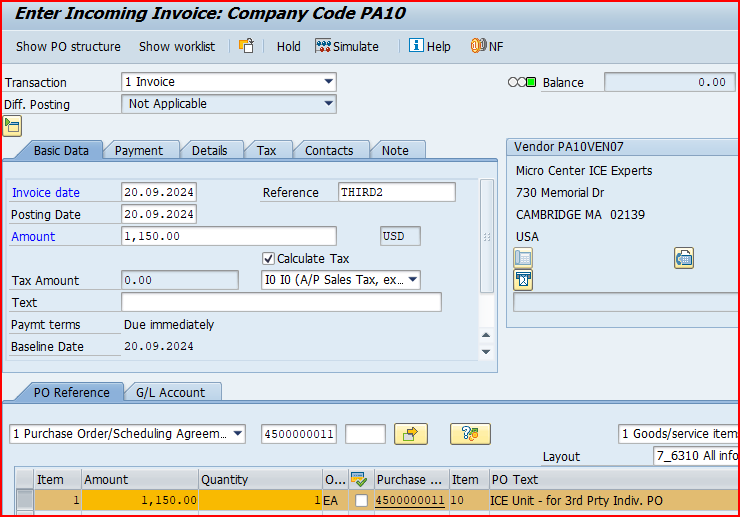
5.2 Scenario 3.2: Third Party Sale with Individual PO
Third-party with Individual Purchase Order is like Third Party Sales but with a difference. The difference is vendor sends the Finished materials to the Business instead of directly sending to the customer. After that our business sends the FG to the customer and send the invoice to the customer.
In this scenario, vendor does not send the invoice immediately with delivering the goods to customer. We ask vendor to send shipping notification after delivering the goods to customer. When we receive the shipping notification then we do MIGO and basing on MIGO quantity we raise invoice to Customer. Without vendor invoice we cannot raise billing to our customer.
Below is the process flow for SAP Third Party Sales with Individual Purchase Order
Picture: SAP Third Party Sales Process with Individual Purchase Order
Please check the below posts to check both the third party sales process step by step in detail
tock transfer in SAP play a crucial role in effective inventory management by enabling the seamless movement of goods between storage locations, plants, or even company codes.
Whether we are transferring stock within the same plant, across different plants, or between different organizational units, SAP stock transfer solutions like 1-step and 2-step transfers, offers flexible and robust solutions to manage these transactions efficiently.
SAP provides multiple stock transfer methods, including one-step and two-step transfers, stock transport orders (STO), and intercompany transfers, each catering to specific business needs.
Stock transfer in SAP can be classified into two types from a broader prospective. These can be further divided into several other types.
Please see below this in pictorial form
Picture: Stock Transfer in SAP: All Scenarios at a Glance
6.1 Stock Transfer with MIGO (Without STO, Delivery & Billing)
This is the simplest form of stock transfer in SAP.
In this scenario, no stock transfer order or purchase order is created.
Stock transfer is directly initiated in MIGO without any predecessor document like STO or PO.
Please see below these types of stock transfer in pictorial form.
Picture: Stock Transfer with MIGO (Without STO, Delivery & Billing)
6.2 Stock Transfer With Stock Transport Order/Purchase Order (STO/PO)
Here stock transfer process starts with a document i.e. stock transport order, which is a kind of purchase order.
There are several types of Stock Transfer With Stock Transport Order/Purchase Order (STO/PO)
All types of Stock Transfer With Stock Transport Order/Purchase Order (STO/PO) is given below in pictorial form
Picture: Stock Transfer With Stock Transport Order/Purchase Order (STO/PO)
Stock Transfer With Stock Transport Order/Purchase Order (STO/PO) can be further divided into three parts
6.2.1 Stock Transfer with STO but without Delivery & Billing
This type of STO is used when transferring stock between two plants within the same company code. It ensures better inventory tracking and valuation compared to a standard transfer posting.
Below is the pictorial representation of this type of STO
Picture: Stock Transfer with STO but without Delivery & Billing
Please see the below post for the details of configuration & testing of STO without Delivery & Billing
6.2.2 Stock Transport Order with Delivery (STO with SD Delivery Process)
This STO type is used when stock transfers require a delivery document generated via SAP SD (Sales & Distribution Module). This is common when warehouse teams handle goods movement through outbound deliveries.
This setup is particularly useful for intra-company transfers where financial transactions are not required
Please see the below picture to see the pictorial representation of this stock transfer method
Picture: Stock Transport Order with Delivery (STO with SD Delivery Process)
Please see the below post for the details of configuration & testing of STO without Delivery & Billing
Intercompany STO is used when transferring stock between plants in different company codes. It requires a more complex process as it involves intercompany billing and affects financial accounting entries.
Please see below the pictorial representation of this method of stock transfer
Picture: Inter-Company STO with Delivery & Billing
Please see the below post for the details of configuration & testing of SAP Intercompany STO Process with Delivery & Billing
Logistics Invoice Verification in SAP S4 HANA is the last step in MM Procure to pay cycle.
In this post
We will first see in detail How to Configure Logistics Invoice Verification in SAP S4 HANA .
Then we will post the invoice depicting different practical scenarios.
Under Logistics Invoice Verification, we will configure system  required for the following areas

-->Processing invoice receipts for different practical scenarios like with Freight, with Taxes etc.

-->Posting to Financial Accounting for different practical scenarios like with Freight, with Taxes etc.
1. Logistics Invoice Verification Configuration
Below configuration is a minimum required configuration to process the invoice receipts.
Note : If you receive below error while creating PO, this indicates missing logistics invoice configuration.
Picture : Error Due to Missing Logistics Invoice Verification Configuration
We will start now logistic Invoice related Configuration.
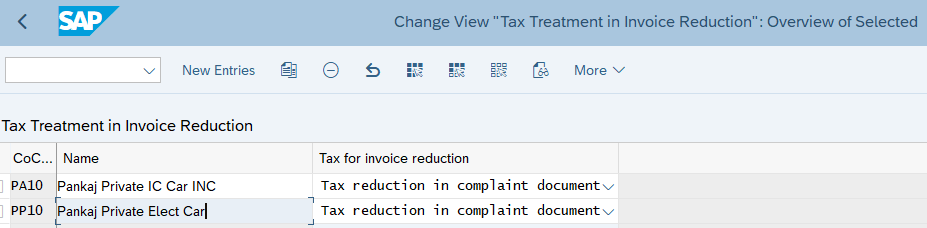
In this step we configure how taxes are to be posted for invoice reduction.
In case of complaint, system creates two accounting documents for invoice reduction. The first document (original document) contains the invoice data sent by the supplier. The second document (complaint document) contains information about the invoice reduction.
If the tax reduction is carried out in the complaint document, the taxes in the original document correspond to those in the supplier invoice. The tax amount for the invoice reduction is credited in the complaint document.
If the tax reduction is carried out in the original document, the taxes in the original document are reduced by the tax amount for the invoice reduction. In this case, the complaint document does not contain any tax postings.
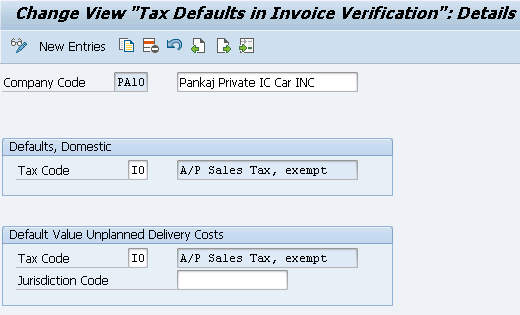
Here we define for each company code which tax code(s) the system suggests when incoming invoices are entered.
Default value is maintained as “I0”
Picture : Tax code Default for PA10 Company Code
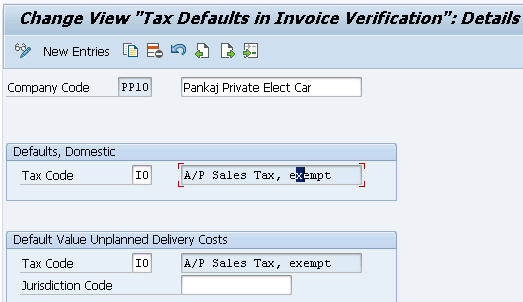
Similarly it is maintained for PP10 Company code
Picture : Tax code Default for PP10 Company Code
1.3 Configure How Exchange Rate Differences are Treated
Here we define how exchange rate differences are to be calculated for incoming invoices in foreign currencies.
We can choose either the value of the exchange rate as the calculation method
Either at the time of goods receipt
Or at the time of the invoice receipt
For our company codes we have chosen at the time of invoice receipt
Picture : Exchange Rate Treatment
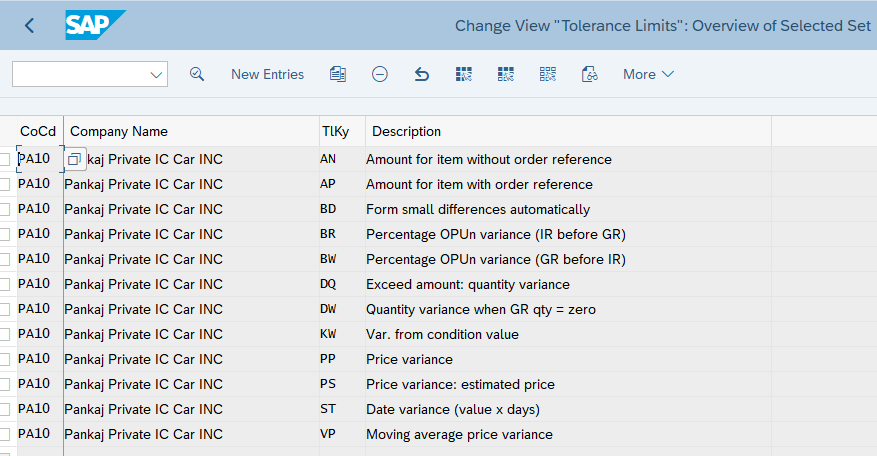
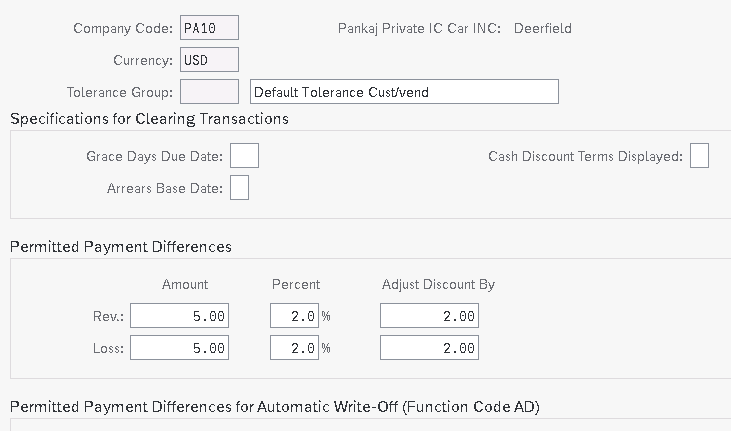
1.4 Set Tolerance Limit
In this activity, we specify the tolerance limits for each tolerance key for each company code.
When processing an invoice, the system checks each item for variances between the invoice and the purchase order or goods receipt. The different types of variances are defined in tolerance keys
Picture : Setting of Tolerance Limit
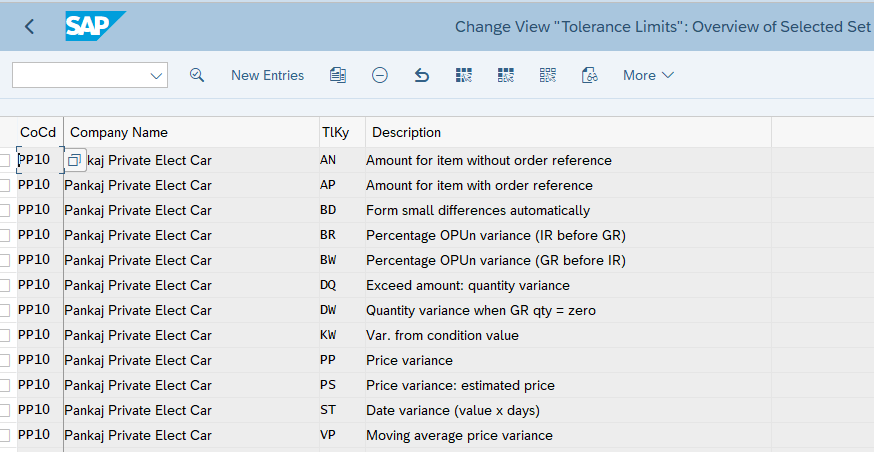
Tolerance limit maintained for the below keys for both the company codes
AN Amount for item without order reference
AP Amount for item with order reference
BD Form small differences automatically
BR Percentage OP Un variance (IR before GR)
BW Percentage OP Un variance (GR before IR)
DQ Exceed amount: quantity variance
DW Quantity variance when GR qty = zero
KW Var. from condition value
PP Price variance
PS Price variance: estimated price
ST Date variance (value x days)
VP Moving average price variance
Picture : Tolerance limit maintained for the PA10 Co.Code Picture : Tolerance limit maintained for the PP10 Co.Code
1.5 Setting Check for Duplicate Invoices
In this step, we configure if the system is to check for duplicate invoices for each company code upon entering invoices. This check is to prevent incoming invoices being accidentally entered and paid more than once.
The accounting documents are checked first, followed by documents from Logistics Invoice Verification (only invoices that are incorrect, on hold, or parked, or those entered for verification in the background). The system only checks for duplicate invoices if a reference document number is specified upon entering the invoice.
Picture : Path to set Check for Duplicate Invoices
Below settings are made for our PA10 & PP10 Company codes
Picture : Setting Check for Duplicate Invoices
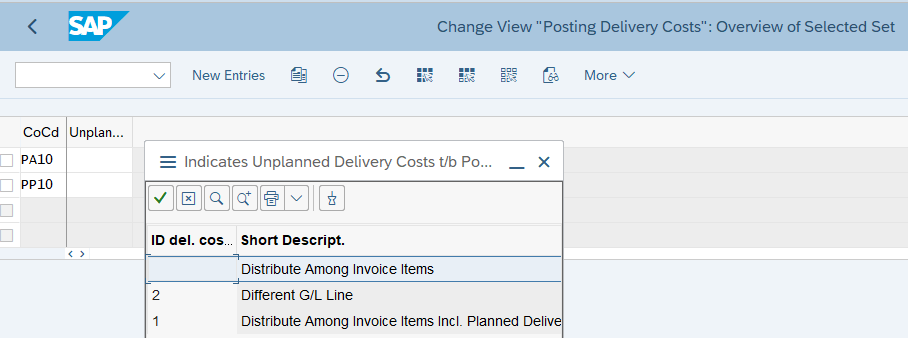
1.6 Setting Configure How Unplanned Delivery Costs Are Posted
Here we specify how the system posts unplanned delivery costs amount the below given two options.
Distributed among the individual items in proportion to the item amounts invoiced so far and the item amounts in the current invoice.
The amounts determined are added to the respective item amounts.
The amounts determined are posted in a separate line for each item.
Posted in a separate line to a separate general ledger account. We must enter a specific tax code for the posting. We can define a default value in the Maintain Default Values for Tax Codes activity.
For our company codes, unplanned delivery costs are to be distributed among invoice items
Picture : Path for Unplanned Delivery Cost DistributionPicture : Unplanned Delivery Cost Distribution Configuration
1.7 Amount authorization for Customers/Vendors in company code
Logistics Invoice verification settings are completed. Now we will post the invoice in the system for different scenarios
2. Invoice Posting for the Different Scenarios
We will now post invoice fist for main material. As vendor is responsible to collect the A/P sales tax , so at the time of incoming invoice posting in SAP S4 HANA MM module , Vendor Account will be debited cost of material + Applicable A/P Sales tax (MM input Tax). You can Check the post for detail How to configure SAP S4 HANA MM Tax in 7 Easy Steps
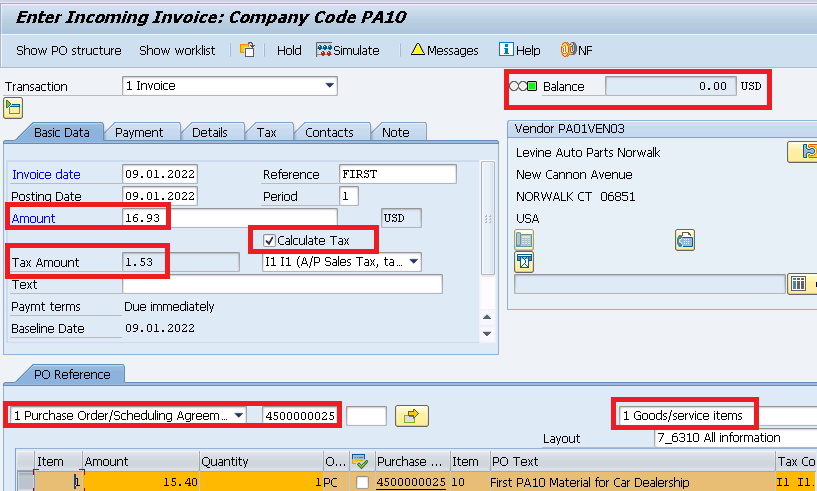
2.1 Invoice for Material &Non-Deductible Tax
Go to MIRO and take reference to your PO
Please check the below post for the PO price components
Base Price (from Info Record)  =14 USD / PC
Surcharge (Manually Entered)  =1.4 USD / PC (10%)
                                --------------------
Net Value (Base for Taxes)        =15.4 USD / PC
                              ---------------------
A/P Sales Tax 1 Inv.	6.000 %	= 0.92 USD
A/P Sales Tax 2 Inv.	3.000 %	= 0.46 USD
A/P Sales Tax 3 Inv.	1.000 %	= 0.15 USD
                              --------------------
Total Tax                                   = 1.53 USD
                              --------------------
Net Value (Including Taxes)      = 16.93 USD / PC
                              --------------------
Freight (Manually Entered)       = 1 USD / PC
            _______________________________________________
Actual Price                            = 17.93 USD / PC
            _______________________________________________
Note
As vendor is responsible to collect the A/P sales tax , so at the time of incoming invoice posting in SAP S4 HANA MM module , Vendor Account will be debited cost of material + Applicable A/P Sales tax (MM input Tax).
So as per the above PO price components Material price + Taxes i.e. 16.93 USD should be debited to vendor
Picture : Invoice Posting
If everything is OK then Balance should be in green and 0.00 shown in above screenshot
Click on “Simulate” and system will show the FI Postings.
Picture : Invoice Posting
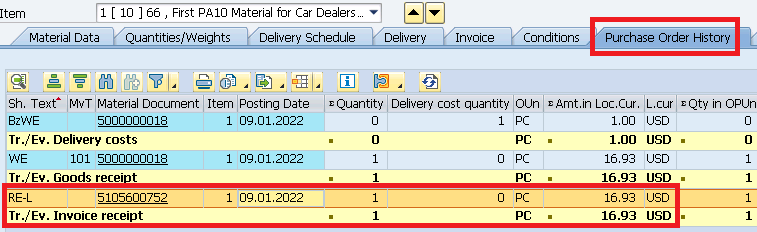
Post the invoice and PO history will be updated
Picture : PO history update after Material material invoice posting
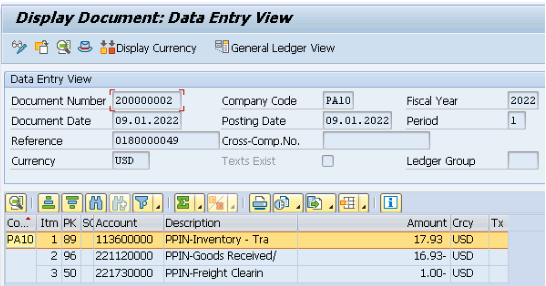
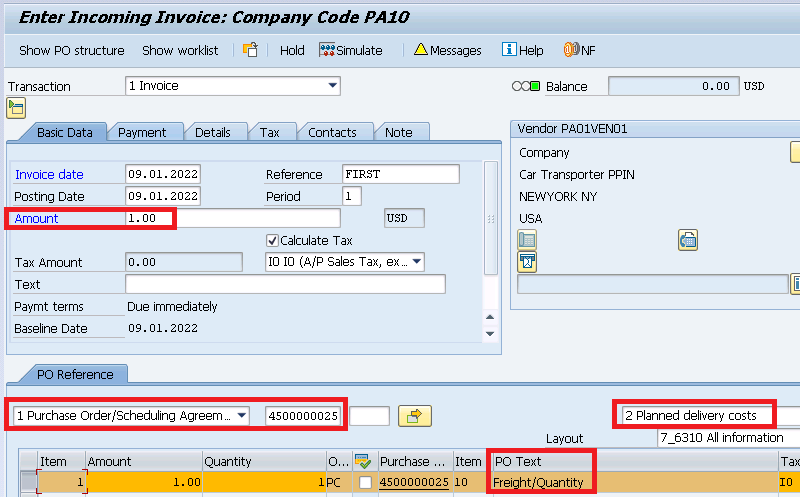
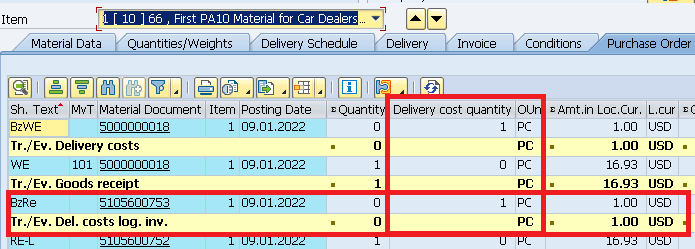
2.2 Invoice for Planed Distribution Cost
We have entered Planned delivery cost (Freight) in our purchase order. At goods receipt, a provision is posted to a freight or customs clearing account. This account is cleared when the invoice is posted.
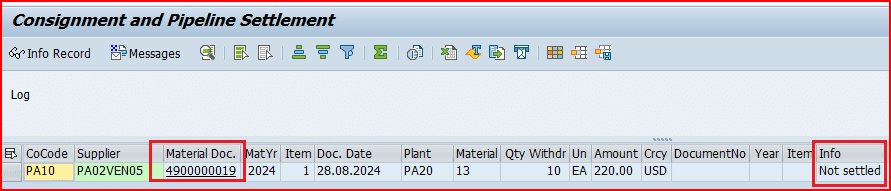
So in the consignment process instead of vendor raising& sending invoices to you, vendor will receive a settlement from us based on the consumption (Withdrawal from the consignment stock)
--> So for the reasons given above, consignment process completes by a special invoicing process called "ERS" i.e. "Evaluated Receipt Settlement" through MRKO instead of invoicing through MIRO
First check with display radio button that all is OK
Picture: Consignment Settlement
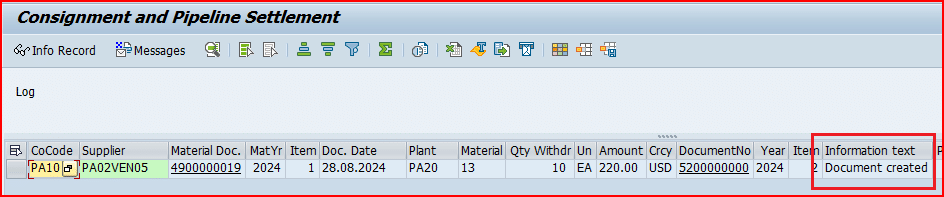
Now settle and System will give the document number as well as the message describing “Document Created”
Picture: Consignment Settlement Posting
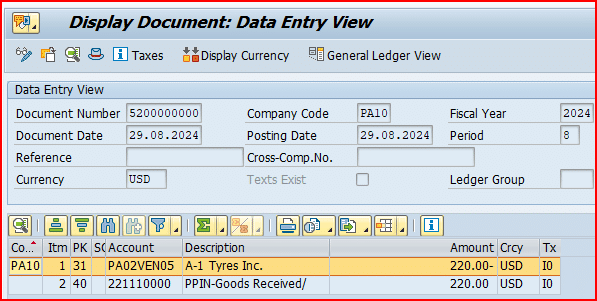
Check the Financial document created
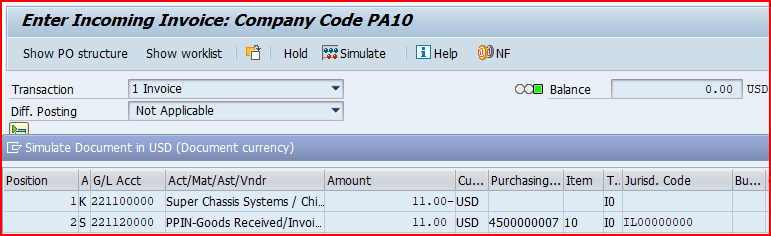
2.3 Invoicing for Subcontracting
We will post the invoice from subcontracting for their service charges for providing the subcon services
Start MIRO and refer Subcon PO as shown in the below screenshot
Picture: Invoice Posting for Subcon PO
Since balance is zero so all OK and post the invoice
It has created the below finance document
Picture: Subcon invoice posting FI Document
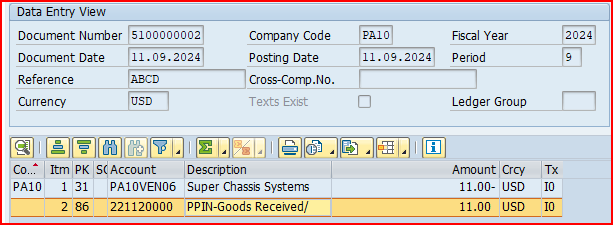
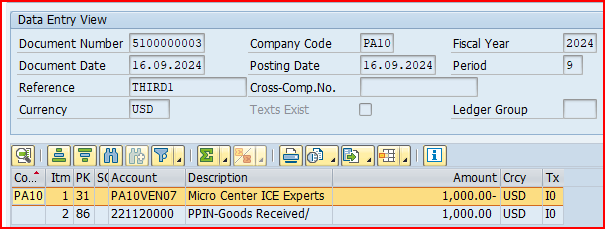
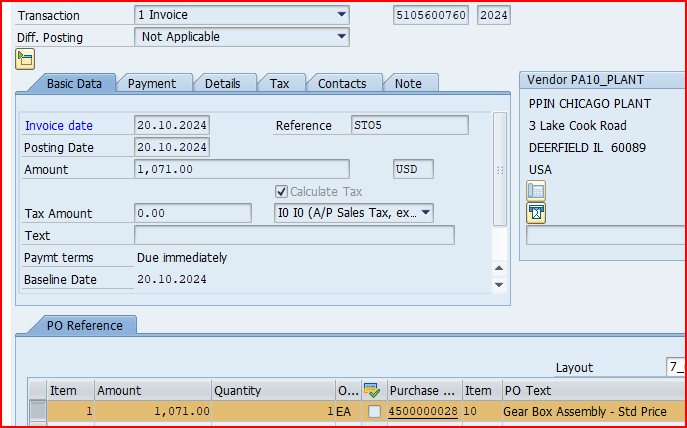
2.4 Invoicing for Third Party Sales
As soon as invoice from the vendor arrives, The invoice verification with reference to purchase order is created. The value and quantity (if GR is done) is proposed by the system.
Picture: Invoice Posting
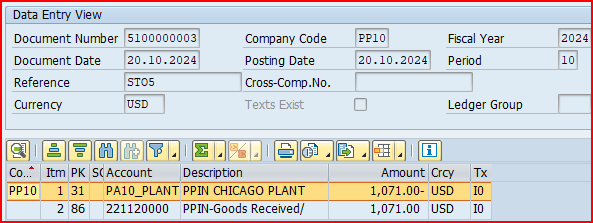
Below Accounting Document is created
Picture: Accounting document posted
Please check the detail step by step end to end third party process in the below post
In the Previous post we have configured MM-FI Integration, which is required to Post the Goods receipt in the system. Please click on the above button to see the details
In this post we will configure all aspects of SAP S4 HANA MM Pricing Procedure. Before starting S4 HANA MM pricing procedure , we will have a look at the pre-requisite configuration, which is required before configuring Pricing Procedure in SAP S4 HANA
1. Pre-Requisite Configurations
Below diagram is showing the configuration (& related posts) required to complete before starting configuration of S4 HANA pricing procedure.
Picture : Pre-requisite Configurations Before MM Pricing Configuration
Once we have completed all the above configurations, we are ready to configure MM Pricing Procedure.
2. Understanding of SAP S4 HANA MM Pricing Procedure
SAP S4 HANA MM Pricing Procedure can be Bifurcated in Two Parts
2.1 Technique behind S4 HANA MM Pricing Procedure (Condition Technique)
To understand SAP S4 HANA MM Pricing Procedure, We need to first have an overview of the working of the pricing conditions in the MM. To understand this we need to understand condition technique. Pricing is broadly used to describe the calculation of price & costs. During Purchase Order processing, the system uses the condition technique to determine automatically the various cost components like discounts, surcharges, freight etc.
2.2 Determination of Pricing Procedure
Let’s start with technique behind working of pricing procedure
3. Condition Technique in S4 HANA MM Pricing Procedure
Condition technique involves the following below elements in sequence.
Condition Types
Access Sequences
Condition Tables
Calculation Schemas
Let,s review all the four elements of condition technique one by one
In SAP S4 HANA MM Pricing Procedure, the first step in defining pricing is configuration of condition types.
We create different type of condition types representing discounts, surcharges, freight, cost, taxes etc. to complete our pricing schema.
Let’s review the configuration of condition type and all the fields associated with it.
Picture : Condition Type Configuration ..First PartPicture : Condition Type Configuration ..Second PartPicture : Condition Type Configuration ..Third PartPicture : Condition Type Configuration ..Fourth Part
4.1 Fields in “Control Data 1” Section of Condition Type Configuration
Below fields are available in control data 1 section of condition type configuration
Picture : Fields in “Control Data 1” Section of Condition Type Configuration
4.1.1 Condition Class
This field determines the category of condition type like : Price, Tax. Discount or surcharge etc.
The most common classes are as follows
4.1.1.1 Condition Class “B”
If a condition type is being configured for gross pricing then condition class “B” will be used.
4.1.1.2 Condition Class “A”
If a condition type is being configured for Quantity or weight discount then condition class “A” will be used.
4.1.1.3 Condition Class “D”
If a condition type is being configured for taxes then condition class “D” will be used.
4.1.2 Calculation Type
This field determines how the condition type will be calculated.
The most common used calculation types are
“B”-For Fixed Amount,
“A”-For percentage
“C”-For quantity
“G” for our own formula
if we use calculation type “G” in a pricing procedures, a condition basis formula and a condition value formula must be assigned to this calculation type.
Note : The formula define here (in MM pricing procedure) works the same way in SD. We use VOFM for the same.
4.1.3 Condition Category
Condition Category is the classification of condition types such as FREIGHT, TAX, PRICE, DISCOUNT.
The condition categories are always hardcoded.
4.1.3.1 Condition Category “F -Freight” vs “B -Delivery costs”
If the vendor is same for Main Purchase Order & Freight then we can select the F category
But if the transportation vendor is different then the Purchase order vendor then we need to select the “B” delivery cost condition category
With condition category “B – Delivery Cost”, we will have the option of entering delivery vendor (other than main vendor) for that condition type in PO and also option of posting this cost to different G/L account based on account key setting in Accrual column in MM pricing procedure and G/L account assignment in OBYC for that account key.
Hint
Condition types are differentiated broadly using the condition class and more definitively using the condition category.
4.1.4 Rounding Rule
Rounding rule determines the rounding up value of the condition type. If the value is set up as “Commercial” then value is rounded off, for example $9.364 round off to $9.36
4.1.5 Plus/Minus Value
This configuration determines if condition type value is treated as positive value or negative value.
Negative values are discounts and positive values are surcharges.
Note : A blank value represents a positive.
4.2 Fields in “Group Condition” Section of Condition Type Configuration
Below three fields are present in this section of condition type configuration
Picture : Fields in “Group Condition” Section of Condition Type Configuration
4.2.1 Group Condition
if this field is checked , then such condition type is determined based on the cumulative value of the line item. for a group condition, all the values of the relevant items (price, order quantities etc) are added and then total is used as condition bases.
For example : a PO has several line items . There is a discount group condition in our PO which gives 10% discount if PO value is exceeds by 1000$ for a particular material group items. in this case if total value of this material distributed in several line item is calculated and compared against 100$ in order to arrive on discount decision, though individually such PO line item may not qualify for discount being less than $1000 order value.
4.2.2 Rounding Difference Comparison
if this field is checked then system compares the total of line items condition values to the condition value at the header level and difference is added to the largest item.
4.2.3 Group Condition Routine
This is used to calculate any alternative value as base to determine the scale value. For example – Group condition base can be a total of all line items weight which belongs to a particular material groups.
4.3 Fields in “Changes which can be made” Section of Condition Type Configuration
Below fields are given in this section of condition type configuration. Let’s review all the fields one by one
Picture : Fields in “Changes which can be made” Section of Condition Type Configuration
4.3.1 Manual Entries
This fields controls the priority of a condition type between manual entries and determined automatically .
Options available are “No Limitations”, or “Automatic entry has priority” which means cannot be entered manually, or “Manual Entry has priority” which means if entered manually, system does not check if a condition record exists and final option “Can not be processed manually”.
4.3.2 Header Condition/Item Condition
The selection of these checkbox determines if the condition type is a header condition type or item condition type.
4.3.3 Delete
This specifies if deletion of this condition type is allowed from the documents
4.3.4 Value
This field controls whether the value can be overwritten on the sales/purchase documents
4.3.5 Calculation Type
This field controls whether we can change the calculation type while processing the document
4.3.6 Amount/Percentage
Controls whether amount or percentage can be changed during document processing.
4.3.7 Quantity Relation
This field controls if conversion factor for the unit of measure of this condition type can be changed during document processing.
4.4 Fields in “Master Data” Section of Condition Type Configuration
This section has below fields.
Picture : Fields in “Master Data” Section of Condition Type Configuration
A pricing condition type sometimes can have a reference to another pricing condition type. We will understand the use of all the above fields through a real scenario
Our requirement is that a pricing condition should flow from PO to Billing for a STO.
In Billing Type, the Pricing Procedure will be SD Pricing Procedure with normal Price Determination settings. But we will not maintain condition Records (through VK11) but we will set Reference Condition , Reference application & reference pricing procedure while configuring this Condition Type (V/06) under “Master Data” Section of Condition Type Configuration as shown in above screenshot.
Now System will access the Condition Record of the Referred Condition Type & reference Application (M – Purchasing).
The other example is a requirement that the Freight paid to Shipment Vendor should be exactly same as one charged to Customer in Sales Order / Invoice. Thus we will use Reference Condition to fulfil this requirement.
4.4.2 Condition Index
This field controls if condition index will be updated or not. we can select this for faster searches.
4.5 Fields in “Scales” Section of Condition Type Configuration
This section of the condition type configuration has several scales related fields. We will review all the fields here.
Picture : Fields in “Scales” Section of Condition Type Configuration
4.5.1 Scale Basis
if no scale type is entered (if this field is blank then it means Scale “Can be maintained in condition record”), then we can specify scale related to money value (scale basis B) or qty (scale basis C) or a weight (Scale basis D or E).
4.5.2 Check Value
This field controls if the scale can be maintained in ascending or descending order.
4.5.3 Scale Type (with Real time examples)
The possible values for scale type are
Blank-Can be maintained in condition records
4.5.3.1 A : Base Scale
Example of Scale type A
From 1 Unit Price is $10
From 11 units price is $9
From 21 price is $8
So if we create a PO for 30 unit then per unit price would be at a discount of $8
4.5.3.2 B : To Scale
Example of Scale type B
Up to 10 Unit Price is $10
Up to 20 units price is $9
Up to 30 unit price is $8
So if we create a PO for 30 unit then per unit price would be at a discount of $8
C : Not Used
4.5.3.3 D : Graduated Scale
in normal scales , system determines one price. while in graduated scale, multiple prices are possible in the pricing screen of an individual item.
Example of a graduated scale
From 1 unit to 10 Unit Price is $10
From 11 to 20 units price is $9
From 21 to 30 unit price is $8
So if we create a PO for 30 unit then first 10 units will be$100, next 10 units will be $90 and the last 10 units will be $80 so PO value will be $270.
4.5.3.4 Scale Routine
if standard scale bases are not sufficient then we can write our own formula to determine alternate scale basis value. Scale formulas are created through VOFM.
4.5.3.5 Scale Unit (Unit of Measure)
This unit of measure is used for group conditions that are weight or volume dependent.
4.6 Fields in “Control Data 2” Section of Condition Type Configuration
There are several important fields in “Control Data 2” Section of Condition Type Configuration. Let’s review them
Picture : Fields in “Control Data 2” Section of Condition Type Configuration
4.6.1 Currency Conversion
If we select this indicator then currency conversion happens after the multiplications of the quantity.
Example – Our company is purchasing some components from abroad, main PO is in INR but freight is in USD so to avoid rounding errors, freight condition type will have this indicator checked so that freight is calculated after the quantity is multiplied.
4.6.2 Promotion Condition
Specifies that the condition type is valid only for promotions. Conditions for which this indicator has been set can only be maintained via the ‘Promotion’ menu – not via the Purchasing menu.
4.6.3 Accruals
This field controls if Condition is Relevant for Accrual (e.g. Freight)
Indicates that the system posts the amounts resulting from this condition to financial accounting as accruals. This appears as statistical on documents i.e. not taken into account in the calculation of net price.
4.6.4 Used for Variant Configuration
This indicators indicates that condition is relevant for variant configuration.
4.6.5 Inter-company Billing
Indicator that defines a condition as relevant for the inter-company process.
Inter-company conditions are usually statistical in the sales order and the customer invoice and not statistical in the inter-company invoice.
4.6.6 Condition Exclusion Indicator
This field controls whether the system automatically excludes the discounts that are proposed during pricing. For example- if a customer is already receiving a favourable price then the discount should be excluded.
We can use exclusion for a particular condition record or for all records of a particular condition type (the field appears on the screen where you define the condition type).
4.6.7 Relevant for Acct. Assignment
If field is blank then condition type is relevant for account assignment.
If “B” is chosen , then the accounting indicator is taken into account for the account assignment.
4.6.8 Condition for Invoice List
Indicates that the condition type is relevant for internal costing
4.6.9 Quantity Conversion
This field controls the quantity conversion during determination of the condition basis.
The field is only relevant for calculation rule ‘C’ (quantity- dependent).
It is relevant if the sales quantity unit and the condition quantity unit are identical (and is different to the basis quantity unit). –> Deactivated: The condition basis quantity is converted via the quantity to the stock keeping unit. This means that the condition quantity is determined for planned factors. This means that a change to the conversion factors in the delivery or the order are not taken into account. Rounding errors can occur during quantity conversion. –> Activated: If the sales quantity unit and the condition quantity unit are identical, the quantity of the document item is used, i.e. the actual quantity.
4.7 Fields in “Sales Pricing” Section of Condition Type Configuration
This section has two fields as given below.
Picture : Fields in “Sales Pricing” Section of Condition Type Configuration
4.7.1 Relevant to Pricing
Indicates that a condition is taken into account during purchase price determination in the sales price calculation function.
The indicator can be maintained during definition of condition types and is taken as a default value when condition records are generated. This default can be changed when the “Pricing relevance can be changed” indicator is set.
In scales, the indicator is used to select the scale line used for price determination in Sales Price Calculation.
4.7.2 Pricing On/Off
If this indicator is set, whether each individual condition record is to be taken into account in the sales price calculation function.
Click HERE to read more on condition technique on SAP help
An access sequence may be assigned to a condition type. The access sequence is a search strategy that enables you to specify the order in which condition tables are to be searched for relevant entries for a condition type.
Picture : Access Sequence
5.1 Silent features of Access Sequence
The order of the accesses is determined by the order of the condition tables in the access sequence.
The Exclusive indicator determines that the search for further valid entries in (other) condition tables is interrupted if an access was successful and a relevant entry was found.
A condition type must have an access sequence assigned to it if you want to maintain conditions with their own validity periods(for example, condition type PB00).
No access sequence assigned to header conditions, discounts, or surcharges
5.2 Requirements in Access Sequence
An access sequence is a search strategy to find the valid data for a condition type. Access sequence outlines the sequence in which system searches for the data.
Every access has a requirement associated with it and every requirement has a routine associated with it. Routines are ABAP codes that perform validation when the particular condition type is associated.
5.3 Exclusion Indicator
If we check this indicator then as soon as valid condition record is found , system stop the further searches for condition records.
Calculation schema is used to calculate costs, prices, period-end rebates, and taxes. This concept is referred to in the Sales and Distribution (SD) area as a pricing procedure.
Calculation schema (pricing procedure) specifies which condition types are to be taken into account in which sequence.
Standard settings
Follow the below path for configuring the pricing schema
SPRO –> Materials Management –> Purchasing –> Conditions –> Define Price Determination Process –> Set Calculation Schema – Purchasing
or use t-code M/08
In the standard system RM0000 and RM1000 calculation schemas are predefined
We have copied RM0000 and created below schema for our car company.
Picture : Our IC Car Plant Pricing Schema , First PartPicture : Our IC Car Plant Pricing Schema , Second PartPicture : Our IC Car Plant Pricing Schema , Third PartPicture : Our IC Car Plant Pricing Schema , Fourth PartPicture : Our IC Car Plant Pricing Schema , Fifth Part
Similar schema is configured for Elect car company too.
Let,s review all the components of calculation schema
7.1 Manual
We check this checkbox if we need to input the value of a pricing condition manually. For example – unplanned freight or a special discount based on the quality complaint of the customer.
7.2 Required
This field is selected if a condition is mandatory i.e. document (sales order/purchase order)should not be completed if this pricing condition is not entered.
7.3 Statistics
This is used when this pricing condition is not required to be included in total value of PO, but only displayed in PO. For example – Rebate condition types. The rebate value is calculated but does not add to the value of PO. When rebate agreement is settled at that time these conditions are used.
7.4 Subtotals
This configuration Controls whether and in which fields condition amounts or subtotals are stored. For example-a customer discount or the cost of a material.
Example
These condition amounts or subtotals are used as a starting point for further calculations. For example – a subtotal of all the discounts included in the pricing of a sales order.
7.5 Requirements
Most of the time pricing needs can not be met by just defining condition type, access sequence, condition table & condition records.
For this SAP has given VOFM routines. These routines are customizable if standard routine is not capable of meeting the requirements. For example – distribution of discount among line item according to the volume instead of value.
Requirements in pricing procedures are used to validate certain conditions before a condition type is activated. For example – a condition need to be activated only if material belongs to a specific material group. We can define our own requirements starting from 900.
7.6 Alternative Calculation of Condition (Formula Condition Value)
Sometimes pricing conditions needs to be calculated by special formula. We can do this through small ABAP code and inputting this routine into the pricing procedure here.
7.7 Alternative Calculation of Condition Base Value
Routine for determining the condition basis as an alternative to the standard.
For Example : An absolute header discount is, for example, distributed in the standard system according to the cumulative value of the items.
7.8 Account Key
Through this key , pricing condition type is linked to GL account. We use this key in OBYC transaction to link this to the respective GL where the value of this condition type need to be posted. This represents MM-FI integration.
7.9 Account Key – Accruals / Provisions
With this account key, the system can post amounts to certain types of accruals accounts. For example, rebate accruals
In this section we will see how pricing procedure is determined in our purchasing documents. Pricing is determined by a combination of schema groups defined by vendors & purchasing organizations.
We need to understand Purchasing info record (PIR) to understand the pricing determination.
8.1 PIR
PIR maintains the relationship between material and vendor. Prices in PIR are defined at material level or purchase organization level. Prices from the last created PO stored in PIR is automatically proposed in the PO.
8.2 Configure MM Pricing determination in 5 easy steps
Below are the steps in brief to determine pricing procedure in 5 easy steps
Time needed: 10 minutes
How to Configure MM Pricing in 5 easy steps
Step 1 – Define Schema Group for Purchasing Organizations
(PA10-IC Car Puchase.org. Schema Group, PP10-Elect Car Purchase.org. Schema Group)
Step 2-Assignment of Schema Group to Purchasing Organization
(PA10->PA10, PP10->PP10)
Step 3-Define Schema Group for Suppliers
(I1-PA10 IC Car Vendor Schema Grp, E1-Elect Car Vendor Schema Grp, I2-PA20 C Car Vendor Schema Grp)
Step 4-Define Calculation Schema
ICCAR001-Schema for IC Car, ELCAR001-Schema for Elec Car
Step 5-Define Schema Determination
Check the respective section for details on schema determination
Step 1 : Define Schema Group for Purchasing Organizations
These allows us to group together purchasing organizations that use the same calculation schema.
|Here SAP has given flexibility if we want to have separate scheme for different purchase org like service purchase organization & Material purchasing organization or export purchasing organization
Picture : Path to Define Schema Group for Purchasing Organizations
|for our car business, we have created two Schema groups for both the Purchasing Organization
Picture : Define Schema Group for Purchasing Organizations
Step 2 :Assignment of Schema Group to Purchasing Organization
Picture : Path to Assignment of Schema Group to Purchasing OrganizationPicture : Assignment of Schema Group to Purchasing Organization
Step 3 :Define Schema Group for Suppliers
Here through this we can assign different pricing determination procedure to different suppliers.
Picture : Path to Define Schema Group for SuppliersPicture : Define Schema Group for Suppliers
Step 3.1 :Define Supplier Schema Group for Inter-company STO Process with Delivery & Billing
|For Inter-company STO Process with Delivery & Billing, we have defines a separate supplier schema group called “02 -SPL Sch.Grp IC STO Dlv Billing”
Picture: Supplier Schema Group for Inter-company STO Process with Delivery & Billing
This supplier schema group “02 -SPL Sch.Grp IC STO Dlv Billing” is inputted in the Supplier BP to be able to determine the correct Pricing Schema in pricing schema determination configuration
Please see the below post to check the BP supplier creation
Step 4 :Define Calculation Schema for Standard Order
We will copy Big schema RM0000 and rename to use for our car business. This schema already has all the necessary condition types required for our car business.
Picture : Path to Define Calculation SchemaPicture : Define Calculation Schema for IC CarPicture : Define Calculation Schema for Electric Car
Step 4.1 :Define Calculation Schema for Inter-company STO Process with Delivery & Billing
for for Inter-company STO Process with Delivery & Billing, we will use SAP standard Schema “A17011”- Intercompany Stock Transfer (US)
Picture: Calculation Schema for Inter-company STO Process with Delivery & Billing
Step 5 : Define Schema Determination for Standard PO
We will define Standard Purchase Order Schema determination. For STOs we will do it later in special post.
At present we are assigning same schema for the vendors of PA10 & PA20 Plants. Please note that, if require, we have made provisions to have separate schema for the vendors of PA10 or PA20 through different vendor schema group as per above step
Step 5.1 : Define Schema Determination for Inter-company STO Process with Delivery & Billing
To determine Calculation Schema for Inter-company STO Process with Delivery & Billing, we use the schema group for supplier as “02”
Picture: Schema Determination for Inter-company STO Process with Delivery & Billing
Note: We have user Schema for Purchasing organization “PP10” because in our Inter-company STO Process with Delivery & Billing scenario, Ordering plant is PP10 .
So supplying plant PA10 will be created as supplier in the PP10 purchasing organization PP10 with schema group for supplier as “02”.
8.3 Pricing Schema for Stock Transport Orders
We will first configure the pricing schema for stock transport order . Once configured we will then determine the pricing schema for stock transport order.
8.3.1 Configure Pricing Schema for Stock Transport Orders
To configure price schema for STO, follow the below path
SPRO –> Materials Management –> Purchasing –> Conditions –> Define Price Determination Process –> Set Calculation Schema – Purchasing
or use t-code M/08
We will use standard pricing schema RM2000 for STO
Picture: Schema for STO
8.3.2 Determine Pricing Schema for Stock Transport Orders
To configure price schema determination for STO, follow the below path
SPRO –> Materials Management –> Purchasing –> Conditions –> Define Price Determination Process –> Define Schema Determination–> Determine Schema for Stock Transport Orders
For stock transport orders, pricing schema is determined depending on the supplying plant, the document type and the schema group of the purchasing organization.
Picture: Pricing Schema Determination for STO
This completes the configuration of SAP S4 HANA MM Pricing Procedure
In the previous post we have configured S4 HANA input Tax procedure which is used in SAP S4 HANA MM Pricing Procedure in this post. Please click on the above button to see the details.
In this post we will unlock the complexities of accounting entries in the SAP Intercompany STO Process with Delivery & Billing with this comprehensive guide.
We will discover the accounting entries for both moving average price (MAP) and standard price materials.
--> This post is to explain the accounting entries in the SAP Intercompany STO Process with Delivery & Billing
--> To check the details of configuration & testing of "SAP Intercompany STO Process with Delivery & Billing", please check the below post
The business scenario for “SAP Intercompany STO Process with Delivery & Billing” involves two separate company codes within the same corporate group.
Plant PP10 orders 1 PC of a material from plant PA10.
The system uses the following prices:
Valuation price of material (Plant PA10): $1000
Order price (Plant PP10): $1060
Price for intercompany billing (Plant PA10): $1071
To understand easily, Prices are given in the pictorial form below
Picture: Pricing Arrangement in Inter-company STO with Billing
1.1 Material Valuation in Supplying Plant
Material valuation in the supplying plant is picked up from the material master data
As shown above, We have set it at $1000 at Moving Average Price (MAP)
Check the price in MM03 “Accounting View”
Picture: Material Price
1.2 STO Order Price
Order price is determined through info records in the ordering plant (PP10) for the supplying vendor (PA10_PLANT) in the ordering plant Purchasing Organization (PP10).
To maintain the same, start ME11 and input the data as stated above
Input the ordering price as $1160
--> As soon as we input intercompany Price in the STO, This PPR0 value becomes inactive as explained HERE
1.3 Intercompany Price
To calculate the intercompany Price in the SAP Intercompany STO Process with Delivery & Billing, we use condition type PI01 & PIC1
1.3.1 Condition Type PI01
PI01 represents the intercompany base price or the cost price to transfer the material between the two company codes.
Intercompany base price is crucial because it forms the foundational value for pricing the material in the intercompany transactions.
--> The price derived from PI01 is set at the supplying plant's cost of goods or the agreed price for the goods being transferred to the receiving company code.
--> Intercompany conditions are usually statistical in the sales order/customer invoice but not statistical in the intercompany invoice.
1.3.2 Condition Type PIC1
The purpose of PIC1 is to ensure the selling company (the supplying plant) reflects a profit in its books from the intercompany sale.
PIC1 helps to adhere to transfer pricing policies often required for financial and tax reporting in multinational corporations.
--> When the billing is generated for the intercompany STO, PIC1 condition type determines the total amount to be billed from the supplying company to the receiving company.
PIC1 refers to PI01 to determine the transfer price.
--> Intercompany price condition records are created based on sales organization of Order (PA10) & Receiving plant
Input the sales organization of order (PA10) & Ordering plant (PP10) along with intercompany prices $1071, and save the entries
Picture: Intercompany Price
Since condition type used in the intercompany STO PIC1 refers to the PI01 so maintaining PI01 through VK11 will automatically set the value of PIC1 in the corresponding Intercompany STO.
1.3.4 Intercompany Price Condition PIC1 in Intercompany STO
As soon as PIC1 is activated through condition record as explained above, system makes main condition type PPR0 inactive.
Picture: Intercompany Price Condition PIC1 in Intercompany STO
2. Accounting Integration Points in the SAP Intercompany STO with Delivery & Billing Process.
in SAP Intercompany STO Process with Delivery & Billing , there are four FI integration points
2.1 Accounting Integration at Goods Issue in the sending Plant
At the time of goods issue in the sending plant , accounting integration happens.
Below are the accounting entries at the time of Goods Issue in the sending Plant.
Debit (+) – Stock Account (Sending Company Code)
Credit (-) – Inventory Change Account (Sending Company Code)
Picture: Accounting integration at Goods Issue in the sending Plant
2.2 Accounting Integration at Goods Receipt in Receiving Plant
At the time of goods receipt in the receiving plant , accounting integration happens.
Below are the accounting entries at the time of Goods receipt in the receiving Plant.
Debit (+) – Stock Account (Receiving Company Code)
Credit (-) – GR/IR Account (Receiving Company Code)
For the above , Value is taken from the intercompany Price as explained in heading 1.3 Intercompany Price
Picture: Accounting integration at Goods Issue in the sending Plant
2.2.1 Accounting Integration at Goods Receipt in Receiving Plant with Standard Material Price.
If material price is “S” then in the whole process of SAP Intercompany STO Process with Delivery & Billing, accounting entries are a bit different at the time of Goods Receipt in Receiving Plant
Below are the accounting entries at the time of Goods receipt in the receiving Plant with material price as “Standard” in receiving plant
Material valuation in receiving plant is $1100 and sending plant is sending the material at $1071.
So the gain of $29 will be posted to the Gain in Price variance
Debit (+) – Stock Account (Receiving Company Code)
Credit (-) – GR/IR Account (Receiving Company Code)
Credit (-) – Gain Price Variance Account (Receiving Company Code)
2.3 Accounting Integration at Intercompany Billing
The next accounting integration point is at the time of intercompany billing.
Below are the accounting entries at the time of Intercompany Billing in the sending Plant.
Debit (+) – Customer Account (PP10_CUST , Sending Company Code)
Credit (-) – Domestic Revenue Account (Sending Company Code)
For the above , Value is taken from the intercompany Price as explained in heading 1.3 Intercompany Price
2.4 Accounting Integration at Invoicing
The next accounting integration point is at the time of Invoicing in the receiving plant.
Below are the accounting entries at the time of Invoicing in the receiving plant.
Debit (+) – GR/IR Account (Receiving Company Code)
Credit (-) – Supplier Account (PA10_Plant, Receiving Company Code)
For the above , Value is taken from the intercompany Price as explained in heading 1.3 Intercompany Price
This completes the accounting Entries in the SAP Intercompany STO Process with Delivery & Billing